EMA Slope + Pullback Pro IndicatorEMA Slope + Pullback Pro Indicator
Core: EMA trend analysis with automated pullback detection.
Key Features:
3-EMA Slope System (9,20,50) with trend signals
Smart Pullback Monitor with visual alerts
Complete Data Table showing all metrics
Multi-Filter System (timeframe + volume)
What It Does:
Shows EMA trends and strength
Detects price pullbacks to EMA levels
Gives entry signals at EMA support/resistance
Filters signals with higher timeframe trend
Visual:
EMA lines on chart
Pullback zones (colored)
Entry arrows
Data table with live metrics
For: Trend + pullback traders wanting automated EMA analysis.
Recherche dans les scripts pour "pro"

Pullback Master ProPullback Master Pro - Scalping & Swing Trading Indicator
Perfect for both scalping and swing trading:
For Scalpers (1-5 min charts):
Quick pullback signals with fast EMA response
Real-time RSI/volume confirmation for rapid entries
Clean signals for fast in/out decisions
For Swing Traders (1H-4H charts):
Multi-timeframe trend filtering for higher accuracy
Deep pullback detection for better risk/reward
Sustained momentum signals for longer holds
Core Features:
Pullback detection with customizable depth
Multi-timeframe trend alignment
RSI + Volume + EMA confluence
Adjustable signal display (opacity, position, size)
Always-visible 3×6 data table
Multiple themes and customization options
One indicator for all timeframes - works equally well for quick scalps and strategic swing trades by adjusting the settings.

RSI Divergence Pro Price Overlay High-Prob v6RSI Divergence Pro — Comprehensive Usage Guide
1) What This Indicator Does (in plain English)
Goal: Detect high-probability reversal (and optionally continuation) points using RSI divergences, then draw clean visual lines on price (red/bearish, green/bullish) and attach a % Strength label to help you quickly decide if it’s worth trading.
Core logic:
• Finds confirmed peaks and valleys using ta.pivothigh and ta.pivotlow.
• Bearish: Price makes Higher High while RSI makes Lower High.
• Bullish: Price makes Lower Low while RSI makes Higher Low.
• Filters for high probability: RSI near OB/OS, min RSI diff, ATR scaling, pivot spacing.
• Draws lines on price chart and attaches % Strength label.
• Alerts trigger only when a new divergence line is drawn.
2) Inputs & What Each One Means
• RSI Period: Shorter = more reactive; longer = smoother.
• Pivot Left/Right: Controls peak/valley confirmation.
• RSI Overbought/Oversold: Default 60/40; tighten for lower TFs.
• Min RSI Divergence: Minimum difference between RSI pivots.
• ATR Length & Min Price Move vs ATR: Ensures structural change.
• Bars Between Pivots: Avoid micro noise and stale signals.
• Hidden Divergence toggle: OFF for reversal; ON for continuation.
3) The % Strength Label — What It Represents
Combines RSI divergence magnitude (60%), Price move vs ATR (30%), OB/OS proximity (10%).
Interpretation:
• 80–100%: A-grade signals.
• 60–79%: Good, tradable with confirmation.
• 40–59%: Caution.
• <40%: Usually skip.
4) High-Probability Trading Workflow (H1)
1. Step 1: Scan & identify the signal.
2. Step 2: Confirm with price action (structure break or engulfing).
3. Step 3: Entry (conservative or aggressive).
4. Step 4: Stop placement (pivot ±0.5×ATR).
5. Step 5: Take profit & management (TP1 1×ATR, TP2 2×ATR, trail).
5) Confluence & Filters
• EMA slope confirmation.
• Structure alignment with S/R zones.
• Volatility regime check.
6) Example Scenarios
• A) Bearish Classic Divergence: HH price + LH RSI, Strength 83%.
• B) Bullish Classic Divergence: LL price + HL RSI, Strength 68%.
• C) Hidden Bullish Divergence: HL price + LL RSI, Strength 75%.
7) Common Pitfalls & How to Avoid Them
• Forcing signals in dead volatility.
• Taking divergences in strong trends without confirmation.
• Ignoring pivot spacing.
8) Tuning for Your Style
• H1 defaults: RSI 10, pivots 5/5, thresholds 60/40.
• M15/M5: thresholds 65/35, min RSI diff 10–12.
• H4/D1: thresholds 58/42, ATR multiple 0.4–0.6.
9) Multi-Asset Notes
• FX majors: overlap session ideal.
• Indices: require engulfing confirmation.
• Crypto: use ATR multiple ≥0.7.
10) Alerts — How to Use Them
• Set alerts Once per bar close.
• Alert names: Bearish RSI Divergence, Bullish RSI Divergence.
11) Backtesting & Forward Testing
• Define rules: entry, stop, TP.
• Track Strength % bins.
12) Troubleshooting & Diagnostics
• No lines? Loosen thresholds.
• Too many lines? Tighten thresholds.
13) Quick Operator’s Checklist
• Signal present?
• Location near S/R?
• Confirmation present?
14) Future Upgrade Options
• Session filter (London–NY overlap).
• EMA slope confirmation.
• Structure-break confirmation.
• Alert text enhancements.

Dow Theory Cockpit [Analytics Pro]1. Overview and Key Features
The core philosophy of this tool is to "Eliminate market noise and pinpoint high-probability trade setups.
🤖 Triple-Logic Engine: Automatically detects three distinct strategies: Trend Following
(Breakout), Retracement (Dip), and Reversal (Sniper).
🛡️ Ironclad Protection: Features an ATR-based dynamic Stop Loss (SL). It automatically
positions your SL at levels resistant to "stop hunting" or market noise.
💰 Automatic Risk Management: The tool calculates and displays the optimal lot size based
on your SL distance, ensuring your risk amount remains constant regardless of market
volatility.
📊 Performance Visualization: Real-time Win Rate panel displaying data for "Today," "This
Month," "This Year," and "All Time.
🌍 Global Market Insights: Monitor not just your active chart, but also Gold, JPY, BTC, and
critical US/JP economic indicators (Interest Rates, Inflation, etc.) simultaneously.
2. Three Entry Signals
The tool automatically toggles between three optimized logics depending on market conditions
Signal Type Target & Strategy 🎯
SNIPER Reversal Captures "Tops and Bottoms." Detects RSI exhaustion + Bollinger
Band mean reversion to catch the start of a reversal.
DIP Trend Following Captures "Pullbacks." Picks up entries when price touches MAs or
retraces during a strong uptrend.
BREAK Trend Following Captures "Breakouts." Rides the momentum the moment price
breaks recent Highs or Lows.
💡 Pro Tip: When multiple conditions align, signals merge (e.g., "SNIPER & DIP") to keep
your chart clean and highlight high-conviction setups.
3. Dashboard Guide
The dual-panel interface is fully customizable in terms of visibility and placement.
① Main Analysis Panel (Default: Top Right)
In-depth analysis of the current currency pair.
・MAIN: Displays the pair and volatility status (HIGH VOL / NORMAL).
・Target RR: Your target Risk:Reward ratio (e.g., 1:1.5).
・🌊 Trend Monitor: Instantly check trend directions across 15M, 1H, 4H, and Daily timeframes.
・Strategic Note: When all timeframes align (Full Alignment), the signal is considered a "high-
probability" setup.
・📊 Win Rate: Tracks success rates and trade counts across four periods (Day, Mo, Yr, All).
・Risk: Shows current risk settings, spread, and account type.
② Market Scanner Panel (Default: Bottom Right)
Multi-market and fundamental surveillance.
・SCANNER: Constant monitoring of Gold, USDJPY, and Bitcoin. It alerts you immediately when
a trend or signal forms on these major assets.
・US/JP ECONOMY: Side-by-side comparison of essential fundamental data:
・Rate: Policy Interest Rates
・Inf%: Inflation (CPI)
・GDP: Economic Growth Rate
・Job: Unemployment / Payrolls
4. Trading Workflow
Follow these steps for the highest success rate:
1.STEP 1: Wait for SignalWait for the audio alert or the "BUY/SELL" label to appear.
Important: Never entry while the candle is still moving.
2.STEP 2: Filter ConfirmationJust before the candle closes, verify:
・MTF Panel: Are the 1H and 4H colors aligned with the signal? (Green for Buy, Red for Sell)
・MA Ribbon: Is the ribbon showing a clean, healthy spread?
3.STEP 3: Execution (At Candle Close)If the signal remains after the candle closes, enter at
the open of the next candle. Use the "Lot: X.XX" value shown on the blue label—this is your
safety-calculated lot size.
4.STEP 4: Exit Strategy (TP/SL)Immediately set your orders based on the lines on the chart:
・🟥 Red Line (SL): Positioned at 3x ATR to withstand noise.
・🟩 Green Line (TP): Optimized for consistent win rates.
5. Customization
・ : Set your Risk(%) per trade (Recommended: 1.0–2.0%). Adjust the SL Buffer (Default 3.0) to balance win rate versus lot size.
・ : Adjust font size (Tiny/Small/Normal) and panel width to fit your screen resolution.
・ : Customize colors and thickness to match your visual preference.

VWAP + EMA 20/50 Scalping PRO - PRAKASH✅ VWAP + EMA 20/50 SCALPING — PRO RULES
1️⃣ Chart Setup (30 seconds)
Timeframe: 1-min or 3-min
Indicators:
VWAP (Session)
EMA 20
EMA 50
Use on Index chart (NIFTY / SENSEX), not option chart
2️⃣ Trend Filter (FIRST CHECK)
Condition Market Bias
EMA 20 > EMA 50 Bullish
EMA 20 < EMA 50 Bearish
EMA 20 = EMA 50 (flat) ❌ No trade
👉 Never trade against EMA alignment
3️⃣ VWAP Position = Permission
Price vs VWAP Allowed Trade
Price above VWAP CE only
Price below VWAP PE only
Price cutting VWAP ❌ Skip
👉 VWAP decides BUY or SELL side
4️⃣ ENTRY SETUP (MOST IMPORTANT)
✅ CE ENTRY
EMA 20 > EMA 50
Price above VWAP
Pullback to EMA 20 or VWAP
Strong green candle close
✅ PE ENTRY
EMA 20 < EMA 50
Price below VWAP
Pullback to EMA 20 or VWAP
Strong red candle close
5️⃣ STOP LOSS & TARGET (FIXED)
Target: 10–15 points
SL:
Below EMA 20 (CE)
Above EMA 20 (PE)
Risk : Reward ≥ 1:2
❌ No SL = no trade
6️⃣ STRIKE SELECTION (OPTION SIDE)
Trade ATM or ±1 strike
Premium range: ₹80–₹150
Strike must move immediately
7️⃣ DO NOT TRADE WHEN ❌
EMA 20 & 50 flat
Price inside VWAP
First 5 minutes of market
Low volume candles

Tableau Angle Pro - Complet Stable V2🇺🇸 ENGLISH DESCRIPTION
Angle Pro Dashboard — Multi-Timeframe (MTF) Momentum with Independent Calibration
OVERVIEW This indicator is a professional momentum analysis tool displaying MACD and KDJ dynamics across 7 simultaneous timeframes (from 30 seconds to 1 hour). It calculates the precise angle of indicators to help you measure real market velocity and trend conviction.
MAJOR UPDATE: INDEPENDENT CALIBRATION This version introduces Timeframe-Specific Calibration. You can now adjust the sensitivity of angles (DIF, DEA, J) individually for each interval. This feature allows you to normalize readings across different volatilities, ensuring a 45° angle on a 30s chart feels as significant as on a 1h chart.
KEY FEATURES
Multi-TF Dashboard: Monitor 30s, 1m, 3m, 5m, 15m, 30m, and 1h in one compact interface.
Precision Control: 7 dedicated setting groups to fine-tune indicator slopes per timeframe.
Angle Measurement: Displays slope in degrees. Steeper angles represent stronger momentum and trend strength.
Dynamic Color Coding: 6 intensity levels based on angle values.
Fully Customizable: Complete MACD/KDJ settings and a fully adjustable color palette.
TRADING INSIGHTS
Trend Cascade: Look for bright color alignment across multiple columns to confirm high-probability trend entries.
Fine-Tuning: Use the "Multi" settings in the calibration menus to increase or decrease sensitivity for specific timeframes based on the asset's current volatility.

Volume-Weighted RSI [VWRSI 2D Pro]A modular, volume-weighted RSI indicator built for clarity and control.
✅ Profile-based auto modes (Scalping → Macro)
✅ Toggleable Buy/Sell signals with strict mode
✅ RSI MA overlays for smoother entries
Buy Signal
RSI crosses above RSI MA
RSI > 50 (or > 55 in strict mode)
Sell Signal
RSI crosses below RSI MA
RSI < 50 (or < 45 in strict mode)
Strict mode filters out weak signals for higher conviction entries.
Volatility-Adaptive RSI Thresholds:
Traditional RSI uses static levels (70/30).
VWRSI Pro replaces these with dynamic bands:
🔹dynHigh = mean + mult × deviation
🔹 dynLow = mean − mult × deviation
Technical write-up can be found here: github.com

Pullback Master Pro CareCThe "Pullback Master Pro" indicator identifies strategic pullback trading opportunities by analyzing price retracements within established trends, using a multi-timeframe approach with customizable higher-timeframe filtering to ensure alignment with the dominant market direction. It detects pullback depth, momentum through RSI oversold/overbought conditions, and volume analysis (spikes and dry-ups) to confirm entries, while providing real-time visual signals and a highly configurable information table that users can position in six different screen locations (corners and mid-sides), choose from three size layouts (small, medium, large), adjust font sizes, and personalize with five color themes (dark, light, blue, green, red) for optimal chart integration and readability.

Buy Sell Signal Pro New (iqraa888)Buy Sell Signal Pro New • by iqraa888
This indicator generates BUY/SELL signals based on EMA trend change and includes ATR-based risk management levels.
Key Features
Trend logic: Fast EMA vs Slow EMA (trend flip detection)
Optional candle confirmation (bullish candle for BUY / bearish candle for SELL)
Automatic SL/TP using ATR with configurable Risk:Reward
Intermediate target levels (TP1, TP2, …) and final TP
Right-side TP number boxes beside each target line
Yellow diamond shows invalidation when an opposite signal appears while in a position
Alerts: BUY, SELL, TP hit, SL hit, Invalidation
Notes
Designed for intraday timeframes (15/30/45 min).
Not financial advice. Always backtest and manage risk.

SMC + VP Pro with POC Confluence [MR.M] V.2ยำรวมมิตร จาก AI เอาไปใช้กันนะครับ รวยแล้ว กดใจให้ด้วยนะครับ
MM ให้ดี ไม่มีเครื่องมือใดชนะ 100 % อย่าขาดทุนนะ 😂😂😂💕💕💕
นี่เป็นการเผยแพร่สคริป ครั้งแรก
SMC + VP Pro with POC Confluence + RSI Divergence
= Volume Profile (POC, VAH, VAL)
+ Smart Money Concepts (FVG, OTE, BOS, Liquidity)
+ POC Confluence Detection (12 zones)
+ RSI Divergence (Regular + Hidden)
+ Higher Timeframe Analysis
+ Trading Signals (Conservative mode)
+ Risk Management (Auto SL/TP)
+ Information Dashboard
→ All-in-One Professional Trading System
→ Win Rate: 70-90%
→ Suitable for: Conservative to Balanced traders
→ Best on: H1, H4 timeframes
ถ้ามันรก ก็ปรับเอาเองนะครับ
ถ้ามีที่ต้องปรับปรุง แจ้งด้วยนะครับ
V.2 ปรับปรุงเพียงเล็กน้อย คือ ปรับ✅ ควรเห็น VAH VAL Label เดียว (ราคาล่าสุด) จากที่ค้างไม่ลบอัตโนมัติ

SMC + VP Pro with POC Confluence [MR.M]ยำรวมมิตร จาก AI เอาไปใช้กันนะครับ รวยแล้ว กดใจให้ด้วยนะครับ
MM ให้ดี ไม่มีเครื่องมือใดชนะ 100 % อย่าขาดทุนนะ 😂😂😂💕💕💕
นี่เป็นการเผยแพร่สคริป ครั้งแรก
SMC + VP Pro with POC Confluence + RSI Divergence
= Volume Profile (POC, VAH, VAL)
+ Smart Money Concepts (FVG, OTE, BOS, Liquidity)
+ POC Confluence Detection (12 zones)
+ RSI Divergence (Regular + Hidden)
+ Higher Timeframe Analysis
+ Trading Signals (Conservative mode)
+ Risk Management (Auto SL/TP)
+ Information Dashboard
→ All-in-One Professional Trading System
→ Win Rate: 70-90%
→ Suitable for: Conservative to Balanced traders
→ Best on: H1, H4 timeframes
ถ้ามันรก ก็ปรับเอาเองนะครับ
ถ้ามีที่ต้องปรับปรุง แจ้งด้วยนะครับ

Vol Compression PRO
## Volatility Compression PRO (Fully Fixed)
This indicator is an **options-theory-inspired “volatility compression → expansion” detector**, enhanced for **crypto trading on 4H/1D**. It is designed as a **two-stage system**:
1. **Environment / Setup (1D)**: Detects a volatility-compressed regime where a breakout is more likely.
2. **Trigger (current chart TF, recommended 4H)**: Confirms the breakout using price structure + volatility expansion + (optional) volume.
A major feature of this script is that it **avoids TradingView’s 5000-bar historical limitation** by recommending a **Daily HV (1D) computation mode**, which is stable and not constrained by intraday bar counts.
---
## Core Concept
### Stage A — “Setup” (Daily Environment Filter)
On the **daily timeframe**, the script estimates realized volatility (HV) and produces an **Environment Score (0–100)** that reflects how “compressed” volatility is versus its own history.
A **Setup window** becomes active when:
* `Environment Score >= Setup Threshold`
* Optional “persistence” can keep Setup active for N days after triggering (to avoid edge flicker).
It also calculates a **daily directional bias** (Bull/Bear) using one of two methods:
* **Price vs Daily EMA** (default): bias is bullish if daily close > daily EMA, bearish if below.
* **MACD > 0**: bias is bullish if daily MACD line > 0, bearish if < 0.
This stage answers:
**“Are we in a volatility-compressed regime worth watching, and what is the higher-timeframe bias?”**
---
## HV / Compression Scoring Model
The script computes:
* **Short-term HV**: standard deviation of log returns over a short window
* **Long-term HV**: standard deviation of log returns over a long window
* **HV Percentile**: percentile rank of short HV over a historical lookback
* **Compression Ratio (S/L)**: short HV divided by long HV (`<1` implies compression, `>1` implies expansion)
* **Log-Z Deviation**: Z-score of log(HV) vs its historical distribution (more stable than raw HV Z-score)
Then it builds a **0–100 score** using weighted components:
* Low HV percentile (lower = more compressed)
* Compression ratio below 1 (more compression)
* Negative log-Z deviation (HV below typical)
This produces a single number: **“Explosion Potential (Environment Score)”**.
---
## Stage B — Trigger Logic (Current Chart Timeframe, recommended 4H)
A **Long Trigger** fires only when **all** of the following are true:
1. **Setup is active** (from daily environment score)
2. **Daily bias is bullish**
3. **Donchian breakout UP**
* Close breaks above the **previous bar’s** highest high of the last N bars
* Uses ` ` to avoid same-bar repaint-style lookback issues
4. **Volatility expansion confirmation**, via either:
* **Bollinger Band Width rising** (BBW turns up and exceeds its mean), and/or
* **ATR% rising** (ATR as % of price increases)
5. **Optional volume confirmation**:
* Volume > SMA(volume) × multiplier (if enabled)
A **Short Trigger** mirrors the long logic (requires bearish bias + downside Donchian break), and can be toggled on/off.
This stage answers:
**“Did price actually escape the compression box, and is volatility expanding with it?”**
---
## Two HV Calculation Modes (5000-bar limitation fix)
### 1) **Daily HV (Recommended)**
* Computes HV + Score + Setup on the **daily timeframe using `request.security(...,"D",...)`**
* This avoids intraday needing thousands of bars to represent many days
* Much more stable and reliable for regime detection
### 2) **Adaptive to Chart TF**
* Computes HV on the **current chart timeframe**
* Includes a strict conversion of “days → bars” and clamps lengths to **<= 4800 bars** to avoid the 5000-bar ceiling
* Still less robust on small timeframes, but won’t crash the script
---
## Visualization
* Plots the **Environment Score** as the main line (colored by score level)
* Draws reference lines at 70 / 50 / 30
* Highlights the background when **Setup** is active
* Optional trigger markers:
* **“L”** for long trigger (triangle up)
* **“S”** for short trigger (triangle down)
* A top-right info panel shows:
* HV short/long, HV percentile, compression ratio, log-Z deviation
* Environment score, Setup active status, daily bias
* Breakout status, expansion confirmation, volume confirmation
* Current mode (“1D fixed” vs “Adaptive”)
---
## Alerts
Built-in alert conditions:
* Setup active (compression window)
* Long Trigger
* Short Trigger
---
## Intended Use (Practical)
* Use **1D** to judge whether volatility is compressed and define bias
* Use **4H** to wait for a clean breakout plus expansion confirmation
* Avoid forcing entries during compression without a real breakout (“don’t catch falling knives” logic)

Apex ICT Delivery & Session Flow ProDescription
The Apex ICT Delivery & Session Flow Pro is a high-precision technical analysis indicator designed for inner-circle traders who prioritize a clean, institutional-grade chart. This script specializes in identifying real-time liquidity levels and displacement zones while utilizing an automated "Cleanup Engine" to ensure that only the most relevant, unmitigated data remains visible.
Core Functionalities
Multi-Timeframe Displacement Engine: The script scans across multiple timeframes (1m, 5m, 15m, 1H) to identify Fair Value Gaps (FVG) created by high-displacement price action. It automatically plots the FVG boxes and the 50% Consequent Encroachment (CE) line for precise entry and target mapping.
Dynamic Session Liquidity: Automatically identifies and tracks the Highs and Lows of the Asia, London, and New York sessions. These levels are explicitly labeled and extended to act as magnet levels for price or points of liquidity reversal.
CISD (Change in State of Delivery): Visualizes shifts in order flow by marking the opening prices of the last opposite candle when price action confirms a change in delivery state. This provides immediate visual feedback on market sentiment shifts.
NY-Specific VWAP: Features a strict New York Session VWAP that resets daily at the NY open (08:00). This serves as the "Mean" for the session, helping traders identify premium and discount zones specifically within the high-volume New York hours.
The "Clean Chart" Cleanup Engine: Unlike standard indicators that clutter the screen with historical data, this script features an intelligent removal system:
FVGs & Order Blocks: Automatically deleted once price trades through them or if they move too far from current price (Proximity Filter).
Broken Session Levels: Highs and Lows are instantly removed once they are breached by price.
Temporal Decay: CISD markers are automatically cleared after 20 candles to keep the focus on immediate delivery.

rosh PACE PRO Locked Look One Signalpace pro, use wit vwap and s/r , xau, btc good enough to genarate 10% profit a ady, use it ,soon i will make it private

Liquidity Trap Detector Pro [PyraTime]The Problem: Why You Get Stopped Out
90% of retail traders place their stop-losses at obvious swing highs and lows. Institutional algorithms ("Smart Money") are programmed to push price through these levels to trigger liquidity, fill their heavy orders, and then immediately reverse the market.
If you have ever had your stop hit right before the market moves exactly where you predicted—you were the victim of a Liquidity Trap.
The Solution: Visualizing the "Stop Hunt"
Liquidity Trap Detector Pro is not just a support/resistance indicator. It is a comprehensive Reversal Scoring Engine.
Unlike standard indicators that spam signals on every wick, this tool uses a proprietary 5-Star Scoring System to analyze the quality of the trap. It validates every signal using Wick Symmetry, RSI Divergence, and Volume Analysis to separate a true reversal from a trend continuation.
Key Features (USP)
- 5-Star Scoring Engine: Every signal is rated from 1 to 5 stars. Stop guessing if a signal is valid; let the algorithm check the confluence for you.
- Glassmorphism Visuals: Gone are the messy lines. We use modern, semi-transparent "Liquidity Zones" that keep your chart clean and professional.
- Smart Terminology: Automatically identifies Bull Traps (Buyers trapped at highs) and Bear Traps (Sellers trapped at lows).
- Heads-Up Display (HUD): A professional dashboard monitors the market state, active filters, and recent trap statistics in real-time.
- Strict Non-Repainting: (Technical Note) This script uses strict non-repainting logic. All Higher Timeframe (HTF) data is confirmed and closed before a signal is generated, ensuring historical accuracy.
---
Tutorial: How to Trade This Indicator
1. Understanding the Signals
We use correct institutional terminology to describe the market mechanics:
GREEN Signal (BEAR TRAP):
- What happened: Price swept a Swing Low, enticing sellers (Bears) to enter. The candle then reversed and closed back inside the range, trapping those sellers.
- The Trade: This is a Bullish Reversal setup (Long).
RED Signal (BULL TRAP):
- What happened: Price swept a Swing High, enticing buyers (Bulls) to breakout. The candle reversed and closed lower, trapping the buyers.
- The Trade: This is a Bearish Reversal setup (Short).
2. The 5-Star Scoring System
Not all traps are created equal. The stars tell you how much "Confluence" exists:
- 1 Star: A basic structure sweep. Risky.
- 3 Stars: A solid setup backed by either Volume or Divergence.
- 5 Stars: The "Perfect" Trap. Structure Sweep + RSI Divergence + Volume Spike + Wick Symmetry. High Probability.
3. The Strategy
- Wait for the Zone: Watch price approach a coloured Liquidity Zone.
- Observe the Reaction: Do not trade blindly. Wait for the candle to close.
- Check the Stars: Look for at least 3 Stars before considering an entry.
- Confirm with HUD: Glance at the Dashboard to ensure the "RSI Filter" and "Vol Filter" agree with your analysis.
---
Settings Guide
Structure Settings:
- Pivot Lookback: Adjusts how sensitive the zones are (Default: 10/5).
- HTF Confirmation: Optional filter to only show traps that align with Higher Timeframe structure (e.g., 1H or 4H).
Quality Filters:
- RSI Divergence: Requires momentum to disagree with price (classic reversal sign).
- Volume Spike: Requires volume to be higher than average (Smart Money footprint).
Visuals:
- Clean Mode: A presenter-favorite feature. Hides all historical zones and leaves only the active setup—perfect for taking screenshots or sharing analysis.
Disclaimer
This tool is designed to assist with technical analysis and identifying potential areas of interest. It does not guarantee profits. Trading involves significant risk; always use proper risk management.

Liquidity Sweep Pro [Whale Edition]Liquidity Sweep Pro is a next-generation trading tool that bridges the gap between Smart Money Concepts (SMC) and Quantitative Volume Analysis.
Traditional "Liquidity Sweep" indicators often generate false signals by marking every wick crossover as a trade setup. This indicator solves that problem by filtering setups through a Quant VSA Engine. It asks not just "Did price sweep a level?" but "Was there institutional money behind this move?"
🔬 How It Works
The indicator operates on three synchronized layers:
1. Market Structure (Liquidity Pools) It automatically identifies key pivot points where retail Stop Losses are likely clustered:
Buy Side Liquidity (BSL): Areas above swing highs.
Sell Side Liquidity (SSL): Areas below swing lows.
2. The Quant Engine (Whale Detection) Instead of using simple volume averages, we apply statistical modeling to detect anomalies:
Log-Normal Z-Score: Normalizes volume data to detect statistically significant outliers (Sigma > 2.5). This adapts to market volatility, filtering out noise.
Kaufman Efficiency Ratio (KER): Analyzes the quality of price movement to classify the "Whale" type:
❄️ Absorption (Iceberg): High Volume + Low Price Movement. Signals a potential reversal.
🚀 Propulsion (Drive): High Volume + High Price Efficiency. Signals an aggressive breakout.
3. The Trigger (Smart Entry) A trade signal is generated ONLY when:
Price sweeps a liquidity level (wicking below/above).
Price closes back within the range.
Institutional Activity is confirmed (High Z-Score Volume).
Trend (EMA 200) and Momentum (RSI) filters are aligned.
🛡️ Features
Intrabar Analysis: Uses request.security_lower_tf to analyze the internal volume delta of the candle for maximum precision.
Automated Risk Management: Plots Entry, Take Profit, and Stop Loss levels directly on the chart based on ATR (Average True Range) and your preferred Risk:Reward ratio.
Unified Alerts: Includes a single "ANY SWEEP" alert condition, allowing you to monitor both Long and Short setups with just one TradingView alert.
Visual Classification: Candles with institutional activity are marked with a 🐋 symbol, even if no sweep occurs, helping you read the narrative.
⚙️ Best Settings & Usage
Timeframes: Works best on 15m, 1h, and 4h charts.
LTF Interval (Input): This is crucial.
If trading on the 1h chart, set LTF to 1 minute.
If trading on the 4h chart, set LTF to 5 minutes.
Whale Threshold: Default is 2.5 Sigma. Increase to 3.0 for fewer, higher-confidence signals, or decrease to 2.0 for more frequency.
⚠️ Disclaimer
This tool is for educational purposes only. It identifies statistical probabilities, not certainties. Always manage your risk and do not rely solely on one indicator.

SCOTTGO - MOMO RVOL Trend Painter V2 (Elite Pro)SCOTTGO - MOMO RVOL Trend Painter V2 (Elite Pro)
This professional-grade trend-following indicator identifies high-probability "Elite" entry points by combining Relative Volume (RVOL) with strict trend alignment and momentum filters. It is designed to filter out market noise and highlight only the most significant institutional moves.
Core Features
Elite Signal Logic: Triggers only when high RVOL (default >2.0x) aligns with a confirmed trend (Price vs. VWAP & 9EMA) and positive momentum (RSI & MACD).
Dynamic Bar Coloring: Instantly paints bars Green (Bullish) or Red (Bearish) when all "Elite" criteria are met.
Smart Labeling: Labels are corner-anchored to the left of the signal bar. This prevents visual clutter and ensures labels never obstruct new price action.
Detailed Tooltips: Hover over any "Elite" flag to see a comprehensive breakdown of the specific metrics (RVOL value, Trend status, RSI, and MACD) that triggered the signal.
Key Components
RVOL Threshold: Adjustable sensitivity to volume spikes.
Trend Filter: Optional requirement for price to stay above/below VWAP and the 9EMA.
Momentum Filters: Integrated RSI and MACD confirmation to avoid "exhaustion" trades.
Visual Customization: Full control over label spacing, colors, and opacity.
How to use: Look for the ⭐ ELITE flags as confirmation for trend continuation or high-volume breakouts. Use the triangles for precise candle entry points.
Disclaimer: Technical analysis tools are for informational purposes only. Trading involves significant financial risk.

CPR PROCPR Pro - Central Pivot Range Indicator
A complete CPR trading toolkit with multi-timeframe support.
█ FEATURES
- CPR Zone (TC, BC, PP) - Daily, Weekly, or Monthly
- Support & Resistance Levels (S1-S3, R1-R3)
- Virgin CPR Detection - Highlights untested CPR zones (yellow)
- CPR Width Analysis - Narrow (breakout) vs Wide (range) days
- VWAP with 10 anchor options
- Trend EMA
- Dashboard with real-time bias & levels
- Customizable colors per timeframe
█ HOW TO USE
- BULLISH: Price above CPR - look for longs
- BEARISH: Price below CPR - look for shorts
- VIRGIN CPR: Untested zones = strong magnets
- NARROW CPR: Expect breakout day
- WIDE CPR: Expect range day
█ COLORS
- Daily CPR: Blue
- Weekly CPR: Green
- Monthly CPR: Orange
- Virgin CPR: Yellow

Volatility Shield ProConcept: Volatility Shield Pro is a multi-dimensional execution engine designed to filter high-probability entries by triangulating Trend, Institutional Volume, and Statistical Exhaustion.
Why this is original: Unlike standard indicators that look at price in a vacuum, this uses a Volume-Weighted ATR (VWATR) to distinguish between retail noise and institutional "Strikes." It integrates an ADR (Average Daily Range) Fuel gauge to prevent entries into exhausted moves, solving the common problem of buying the "top" of a trend.
Components & Logic:
Institutional Strike Engine: Uses VWATR normalized against a 50-period SMA to find momentum backed by volume.
ADR Fuel Gauge: Calculated by comparing current price travel to the 10-day ADR. A "State" of EXHAUSTED is triggered at 120% to warn of mean reversion.
HTF Anchor: A built-in Higher Time Frame EMA filter (default 4H) to ensure local trades align with the macro tide.
Live EDGE Tracker: A real-time backtesting module that calculates the win rate of the "Strike" signals on the current chart history using a 1.5:1 Reward-to-Risk ratio.
This combined tool addresses the three main reasons most trading systems fail by integrating higher-timeframe bias, daily range exhaustion, and volume confirmation into one framework:
Fighting the Tide (HTF Ribbon): Keeps traders aligned with the dominant higher-timeframe trend to avoid counter-trend entries.
Running Out of Gas (ADR Fuel): Measures a symbol’s average daily range to prevent chasing moves that have already reached their statistical limit.
Ghost Volume (RVOL/VWATR): Filters out low-quality, retail-driven activity by requiring institutional-level volume spikes before taking trades.
In essence, it combines trend alignment, range exhaustion detection, and real-volume filtering to eliminate the most common account-killing mistakes.
The "Triple-Threat" Trade Setup
This is the highest-probability setup the tool can produce. When these three things align, the "Edge" is at its peak:
The Anchor: HTF Ribbon is Bright Green.
The Local: Atlas Trend Bias is BULLISH and State is STRIKE.
The Value: ADR Fuel is Low (40-60%), meaning the stock has massive room to move before hitting daily resistance.

Volatility Squeeze Pro [JOAT]
Volatility Squeeze Pro — Advanced Volatility Compression Analysis System
This indicator addresses a specific analytical challenge in volatility analysis: how to identify periods when different volatility measurements show compression relationships that may indicate potential energy buildup in the market. It combines two distinct volatility calculation methods—standard deviation-based bands and ATR-based channels—with a momentum oscillator to provide comprehensive volatility state analysis.
Why This Combination Provides Unique Analytical Value
Traditional volatility indicators typically focus on single measurements, but markets exhibit different types of volatility that require different analytical approaches:
1. **Closing Price Volatility** (Standard Deviation): Measures how much closing prices deviate from their average
2. **Trading Range Volatility** (ATR): Measures the actual high-to-low trading ranges
3. **Directional Momentum**: Measures where price sits within its recent range
The problem with using these individually:
- Standard deviation alone doesn't account for intraday volatility
- ATR alone doesn't consider closing price clustering
- Momentum alone doesn't provide volatility context
- No single measurement captures the complete volatility picture
This indicator's originality lies in creating a comprehensive volatility analysis system that:
**Identifies Volatility Compression**: When closing price volatility contracts inside trading range volatility, it suggests potential energy buildup
**Provides Momentum Context**: Shows directional bias during compression periods
**Offers Multi-Dimensional Analysis**: Combines three different analytical approaches into one coherent system
**Delivers Real-Time Assessment**: Continuously monitors the relationship between different volatility types
Technical Innovation and Originality
While individual components (Bollinger Bands, Keltner Channels, Linear Regression) are standard, the innovation lies in:
1. **Volatility Relationship Detection**: The mathematical comparison between standard deviation bands and ATR channels creates a unique compression identification system
2. **Integrated Momentum Analysis**: Linear regression-based momentum calculation provides directional context specifically during volatility compression periods
3. **Multi-State Visualization**: The indicator provides clear visual encoding of different volatility states (compressed vs. normal) with momentum direction
4. **Adaptive Threshold System**: The squeeze detection automatically adapts to different instruments and timeframes without manual calibration
How the Components Work Together Analytically
The three components create a comprehensive volatility analysis framework:
**Standard Deviation Component**: Measures closing price dispersion around the mean
float bbBasis = ta.sma(close, bbLength)
float bbDev = bbMult * ta.stdev(close, bbLength)
float bbUpper = bbBasis + bbDev
float bbLower = bbBasis - bbDev
**ATR Channel Component**: Measures actual trading range volatility
float kcBasis = ta.ema(close, kcLength)
float kcRange = ta.atr(atrLength)
float kcUpper = kcBasis + kcRange * kcMult
float kcLower = kcBasis - kcRange * kcMult
**Squeeze Detection Logic**: Identifies when closing price volatility compresses within trading range volatility
bool squeezeOn = bbLower > kcLower and bbUpper < kcUpper
// This condition indicates closing prices are clustering more tightly
// than the typical trading range would suggest
**Momentum Context Component**: Provides directional bias during compression
float highestHigh = ta.highest(high, momLength)
float lowestLow = ta.lowest(low, momLength)
float momentum = ta.linreg(close - math.avg(highestHigh, lowestLow), momLength, 0)
float momSmooth = ta.sma(momentum, smoothLength)
The analytical relationship creates a system where:
- Squeeze detection identifies WHEN volatility compression occurs
- Momentum analysis shows WHERE price is positioned during compression
- Combined analysis provides both timing and directional context
How the Volatility Comparison Works
The indicator compares two volatility measurements:
Standard Deviation Bands
These measure how much closing prices deviate from their average. When prices cluster tightly around the average, the bands contract.
// Standard deviation bands calculation
float bbBasis = ta.sma(close, bbLength)
float bbDev = bbMult * ta.stdev(close, bbLength)
float bbUpper = bbBasis + bbDev
float bbLower = bbBasis - bbDev
ATR-Based Channels
These measure volatility using Average True Range—the typical distance between high and low prices. They respond to the actual trading range rather than closing price dispersion.
// ATR-based channels calculation
float kcBasis = ta.ema(close, kcLength)
float kcRange = ta.atr(atrLength)
float kcUpper = kcBasis + kcRange * kcMult
float kcLower = kcBasis - kcRange * kcMult
The Squeeze Condition
A "squeeze" is detected when the standard deviation bands are completely contained within the ATR channels:
// Squeeze detection
bool squeezeOn = bbLower > kcLower and bbUpper < kcUpper
This condition indicates that closing price volatility has compressed relative to the overall trading range.
The Momentum Component
The momentum oscillator measures where price sits relative to its recent high-low range, using linear regression for smoothing:
// Momentum calculation
float highestHigh = ta.highest(high, momLength)
float lowestLow = ta.lowest(low, momLength)
float momentum = ta.linreg(close - math.avg(highestHigh, lowestLow), momLength, 0)
float momSmooth = ta.sma(momentum, smoothLength)
Positive values indicate price is above the midpoint of its recent range; negative values indicate below.
Why Display Both Together
The squeeze detection shows WHEN volatility is compressed. The momentum reading shows the current directional bias of price within that compression. Together, they provide two pieces of information:
1. Is volatility currently compressed? (squeeze status)
2. Where is price leaning within the current range? (momentum)
These are observations about current conditions, not predictions about future movement.
Visual Elements
Momentum Histogram — Bars showing momentum value
- Green shades: Positive momentum (price above range midpoint)
- Red shades: Negative momentum (price below range midpoint)
- Brighter colors: Momentum increasing
- Faded colors: Momentum decreasing
Squeeze Dots — Circles on the zero line
- Red: Squeeze condition active
- Green: No squeeze condition
Release Markers — Triangle markers when squeeze condition ends
Dashboard — Current readings and status
Color Scheme
Squeeze Active — #FF5252 (red)
No Squeeze — #4CAF50 (green)
Momentum Positive — #00E676 / #81C784 (green shades)
Momentum Negative — #FF5252 / #E57373 (red shades)
Inputs
Standard Deviation Bands:
Length (default: 20)
Multiplier (default: 2.0)
ATR Channels:
Length (default: 20)
Multiplier (default: 1.5)
ATR Period (default: 10)
Momentum:
Length (default: 12)
Smoothing (default: 3)
How to Read the Display
Red dots indicate the squeeze condition is present
Green dots indicate normal volatility relationship
Histogram direction shows current momentum bias
Histogram color brightness shows whether momentum is increasing or decreasing
Alerts
Squeeze condition started
Squeeze condition ended
Squeeze ended with positive momentum
Squeeze ended with negative momentum
Extended squeeze (8+ bars)
Important Limitations and Realistic Expectations
Volatility compression detection is a mathematical relationship between calculations—it does not predict future price movements
Many compression periods do not result in significant price expansion or directional moves
Momentum direction during compression does not reliably indicate future breakout direction
This indicator analyzes current and historical volatility conditions only—it cannot predict future volatility
False signals are common—not every squeeze leads to tradeable price movement
Different parameter settings will produce different compression detection sensitivity
Market conditions, news events, and fundamental factors often override technical volatility patterns
No volatility indicator can predict the timing, direction, or magnitude of future price movements
This tool should be used as one component of comprehensive market analysis
Appropriate Use Cases
This indicator is designed for:
- Volatility state analysis and monitoring
- Educational study of volatility relationships
- Multi-dimensional volatility assessment
- Supplementary analysis alongside other technical tools
- Understanding market compression/expansion cycles
This indicator is NOT designed for:
- Standalone trading signal generation
- Guaranteed breakout prediction
- Automated trading system triggers
- Market timing precision
- Replacement of fundamental analysis
Understanding Volatility Analysis Limitations
Volatility analysis, while useful for understanding market conditions, has inherent limitations:
- Past volatility patterns do not guarantee future patterns
- Compression periods can extend much longer than expected
- Expansion periods may be brief and insufficient for trading
- External factors (news, fundamentals) often override technical patterns
- Different markets and timeframes exhibit different volatility characteristics
— Made with passion by officialjackofalltrades

Round Level Pro Stats
Here is a professional English description of your indicator, which you can use for your own records or if you ever want to share it on the TradingView Community Scripts:
Indicator Name: Dynamic Round Levels & Historical Strength Grid
Overview
This indicator is a sophisticated technical analysis tool designed to identify and evaluate "Round Number" psychological levels (e.g., 1.17100, 1.17200, 1.17300). Unlike a static grid, this tool actively scans historical data to provide a "Strength Score" for each level, helping traders distinguish between minor price points and significant historical reaction zones.
Key Features
Automated Price Grid: Generates a clean, horizontal grid based on user-defined price intervals (Steps). Perfect for Forex (0.001 pips), Stocks, or Crypto.
Historical Strength Engine: Analyzes up to 5,000 historical bars to calculate how "respected" a price level is.
The "3-Candle Confirmation" Logic: A level's strength is only increased if the price touches the line and successfully reverses/bounces, staying on the same side for at least 3 subsequent candles.
Smart Visual Coding:
Green (High Strength): Levels with >60% historical reversal success.
Orange (Medium Strength): Levels with 35%–60% success.
Red (Low Strength): Levels frequently breached without reaction.
Pro HUD Display: Bold percentage labels are positioned at the far right of the chart (near the price scale) to keep the main trading area clutter-free.
How to Use
Set your Step: For Forex, use 0.001 to see 10-pip increments. For Bitcoin or Gold, use 10 or 100.
Lookback Period: Adjust the history scan (up to 5,000 bars) to match your trading timeframe.
Identify Support/Resistance: Look for Green % STR labels. These represent "Round Numbers" that have acted as strong barriers in the past, offering higher-probability entry or exit points.
Technical Summary for Pine Script
Language: Pine Script v5
Max Lines/Labels: 500 (Optimized for performance)
Placement: Far-right margin alignment using bar_index offsets.

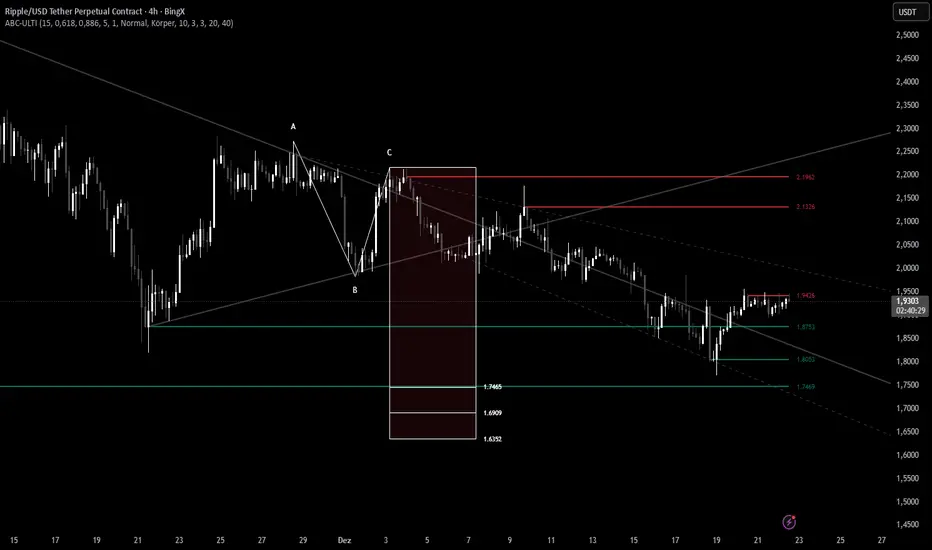
ABC Pro Ultimate S/RABC Pro Ultimate is a high-precision trading tool designed to identify harmonic ABC (Zigzag) patterns and combine them with institutional Support & Resistance levels. Unlike standard indicators that clutter your chart with noise, this script filters for high-relevance pivot points from the distant past to provide truly meaningful trade setups.
Unmitigated MTF High Low Pro - Cave Diving Bookmap Heatmap Plot
Unmitigated MTF High Low Pro - Cave Diving Bookmap Heatmap Plot
---
## 📖 Table of Contents
1. (#what-this-indicator-does)
2. (#core-concepts)
3. (#visual-components)
4. (#the-cave-diving-framework)
5. (#how-to-use-it-for-trading)
6. (#settings--customization)
7. (#best-practices)
8. (#common-scenarios)
---
## What This Indicator Does
The **Unmitigated MTF High Low v2.0** tracks unmitigated (untouch) high and low levels across multiple timeframes, helping you identify key support and resistance zones that the market hasn't revisited yet. Think of it as a sophisticated memory system for price action - it remembers where price has been, and more importantly, where it *hasn't been back to*.
### Why "Unmitigated" Matters
In futures trading, especially on instruments like NQ and ES, the market has a tendency to revisit levels where liquidity was left behind. An "unmitigated" level is one that hasn't been touched since it was formed. These levels often act as magnets for price, and understanding their age and proximity gives you a significant edge in:
- **Entry timing** - Waiting for price to approach tested levels
- **Exit planning** - Taking profits before ancient resistance/support
- **Risk management** - Avoiding entries when approaching multiple old levels
- **Liquidity mapping** - Visualizing where orders likely cluster
---
## Core Concepts
### 1. **Sessions & Age**
The indicator uses **New York trading sessions** (6:00 PM to 5:59 PM NY time) as the primary time measurement. This aligns with how futures markets naturally segment their activity.
**Age Categories:**
- 🟢 **New (0-1 sessions)** - Fresh levels, recently formed
- 🟡 **Medium (2-3 sessions)** - Tested by time, gaining significance
- 🔴 **Old (4-6 sessions)** - Highly significant, survived multiple days
- 🟣 **Ancient (7+ sessions)** - Extreme significance, major support/resistance
The longer a level remains unmitigated, the more significant it becomes. Think of it like compound interest - time adds weight to these zones.
### 2. **Multi-Timeframe Tracking**
You can set the indicator to track high/low levels from any timeframe (default is 15 minutes). This means you're watching for unmitigated 15-minute highs and lows while trading on, say, a 1-minute or 5-minute chart.
**Why this matters:**
- Higher timeframe levels have more weight
- You can see multiple timeframe structure simultaneously
- Helps you avoid fighting larger timeframe momentum
### 3. **Mitigation**
A level becomes "mitigated" (deactivated) when price touches it:
- **High levels** are mitigated when price reaches or exceeds them
- **Low levels** are mitigated when price reaches or goes below them
Once mitigated, the level disappears from view. The indicator only shows you the untouch levels that still matter.
---
## Visual Components
### 📊 The Dashboard Table
Located in the corner of your chart (configurable), the table shows:
```
┌─────────┬───────────┬────────┬─────┬───────┐
│ Level │ Price │ Points │ Age │ % │
├─────────┼───────────┼────────┼─────┼───────┤
│ ↑↑↑↑↑ │ 21,450.25 │ +45.50 │ 8 │ +0.21%│ ← 5th High (Ancient)
│ ↑↑↑↑ │ 21,430.00 │ +25.25 │ 5 │ +0.12%│ ← 4th High (Old)
│ ↑↑↑ │ 21,420.50 │ +15.75 │ 3 │ +0.07%│ ← 3rd High (Medium)
│ ↑↑ │ 21,412.00 │ +7.25 │ 1 │ +0.03%│ ← 2nd High (New)
│ ↑ ⚠️ │ 21,408.25 │ +3.50 │ 0 │ +0.02%│ ← 1st High (Proximity Alert!)
├─────────┼───────────┼────────┼─────┼───────┤
│ 15 mins │ 🟢 │ Δ 8.75 │ 2U │ │ ← Status Row
├─────────┼───────────┼────────┼─────┼───────┤
│ ↓ ⚠️ │ 21,399.50 │ -5.25 │ 0 │ -0.02%│ ← 1st Low (Proximity Alert!)
│ ↓↓ │ 21,395.00 │ -9.75 │ 2 │ -0.05%│ ← 2nd Low (Medium)
│ ↓↓↓ │ 21,385.25 │ -19.50 │ 4 │ -0.09%│ ← 3rd Low (Old)
│ ↓↓↓↓ │ 21,370.00 │ -34.75 │ 6 │ -0.16%│ ← 4th Low (Old)
│ ↓↓↓↓↓ │ 21,350.75 │ -54.00 │ 9 │ -0.25%│ ← 5th Low (Ancient)
├─────────┼───────────┼────────┼─────┼───────┤
│ 📊 15↑ / 12↓ │ ← Statistics (optional)
└─────────┴───────────┴────────┴─────┴───────┘
```
**Reading the Table:**
- **Level Column**: Number of arrows indicates position (1-5), color shows age
- **Price**: The actual price level
- **Points**: Distance from current price (+ for highs, - for lows)
- **Age**: Number of full sessions since creation
- **%**: Percentage distance from current price
- **⚠️**: Proximity alert - price is within threshold distance
- **Status Row**: Shows timeframe, direction (🟢 bullish/🔴 bearish), tunnel width (Δ), and Strat pattern
### 📈 Visual Elements on Chart
**1. Level Lines**
- Horizontal lines showing each unmitigated level
- **Color-coded by age**: Bright colors = new, darker = older, deep purple/teal = ancient
- **Line style**: Customizable (solid, dashed, dotted)
- Automatically turn **yellow** when price gets close (proximity alert)
**2. Price Labels**
- Show the exact price and age: "21,450.25 (8d)"
- Fixed at small size for clean readability
- Positioned with configurable offset from current bar
**3. Bands (Optional)**
- Shaded zones between pairs of unmitigated levels
- Default: Between 1st and 2nd levels (the "tunnel")
- Can switch to 1st-3rd, 2nd-3rd, or disable entirely
- **Upper band** (pink/maroon) - Between unmitigated highs
- **Lower band** (blue/teal) - Between unmitigated lows
- These represent the "no man's land" or consolidation zones
---
## The Cave Diving Framework
This indicator is designed around the **Cave Diving Trading Framework** - a psychological and technical approach that maps cave diving safety protocols to futures trading risk management.
### 🤿 The Core Metaphor
**Cave diving has clear danger zones based on depth and overhead environment. Your trading should too.**
#### Shallow Water (New Levels, 0-1 Sessions)
- **Light**: Bright colors (bright red highs, bright green lows)
- **Psychology**: Fresh territory, recently tested
- **Trading**: Be aware but not overly concerned
- **Cave Diving Parallel**: You can see the surface, easy exit
#### Penetration Depth (Medium Levels, 2-3 Sessions)
- **Light**: Medium intensity colors
- **Psychology**: Building significance, market memory forming
- **Trading**: Start respecting these levels for entries/exits
- **Cave Diving Parallel**: Deeper in, need to track your line back
#### Deep Dive Zone (Old Levels, 4-6 Sessions)
- **Light**: Dark colors (deep maroon, dark blue)
- **Psychology**: Highly tested support/resistance
- **Trading**: Major decision points, plan accordingly
- **Cave Diving Parallel**: Significant overhead, careful navigation required
#### Overhead Environment (Ancient Levels, 7+ Sessions)
- **Light**: Very dark, purple/deep teal
- **Psychology**: Extreme caution required, major liquidity zones
- **Trading**: These are your "turn back" signals - don't fight ancient levels
- **Cave Diving Parallel**: Maximum danger, no room for error
### 🎯 The Proximity Alert System
Just like a cave diver's depth gauge that warns at critical thresholds, the proximity alerts (⚠️) tell you when you're entering a danger zone. When price gets within your configured threshold (default 5 points), the indicator:
- Highlights the level in **yellow** on the chart
- Shows **⚠️** in the table
- Signals: "You're entering a high-significance zone - adjust your position accordingly"
This prevents the trading equivalent of going deeper into a cave without checking your air supply.
---
## How to Use It for Trading
### 🎯 Entry Strategies
**1. The "Bounce Setup" (Mean Reversion)**
- Wait for price to approach an old or ancient unmitigated level
- Look for confluence: multiple levels nearby, bands narrowing
- Enter when price shows rejection (reversal candle patterns)
- **Example**: Price drops to a 6-session-old low, shows bullish engulfing → Long entry
**2. The "Break and Retest" (Trend Following)**
- Wait for price to break through an unmitigated level (mitigates it)
- Enter on the retest of the newly broken level
- **Example**: Price breaks above 4-session-old high → Wait for pullback to that level → Long entry
**3. The "Tunnel Trade" (Range Trading)**
- When bands are active, trade the range between 1st-2nd levels
- Short near upper band resistance, long near lower band support
- Exit at opposite side or when bands break
### 🚨 Risk Management Rules
**The Ancient Level Rule**
> Never fight ancient levels (7+ sessions). If you're long and approaching an ancient high, take profits. If you're short and approaching an ancient low, take profits.
These levels have survived a full trading week without being touched - there's likely significant liquidity and institutional interest there.
**The Proximity Exit Rule**
> When you see ⚠️ proximity alerts on multiple levels above/below your position, tighten stops or scale out.
This is your "overhead environment" warning. You're in dangerous territory.
**The New Level Filter**
> Be cautious taking positions based solely on new levels (0-1 sessions). Wait for them to age or combine with other confluence.
Fresh levels haven't been tested by time. They're like unconfirmed support/resistance.
### 📊 Reading Market Structure
**Bullish Structure (🟢 in status row)**
- Unmitigated lows are aging and holding
- Price respecting the lower band
- Old lows below acting as strong support
- **Bias**: Look for long entries at lower levels
**Bearish Structure (🔴 in status row)**
- Unmitigated highs are aging and holding
- Price respecting the upper band
- Old highs above acting as strong resistance
- **Bias**: Look for short entries at higher levels
**The Tunnel Compression**
- When the Δ (delta) in the status row is small, levels are tight
- This often precedes a breakout
- **Trading**: Wait for breakout direction, then trade the break
### 🔄 Strat Integration
The indicator shows Strat patterns in the status row:
- **1** - Inside bar (consolidation)
- **2U** - Broke high only (bullish)
- **2D** - Broke low only (bearish)
- **3** - Broke both (wide range, volatility)
Use these with the unmitigated levels:
- **2U near old high** → Potential resistance, watch for rejection
- **2D near old low** → Potential support, watch for bounce
- **3 pattern** → High volatility, respect wider stops
---
## Settings & Customization
### 📅 Session & Timeframe Settings
**HL Interval** (Default: 15 minutes)
- The timeframe for high/low calculation
- **Lower (1m, 5m)**: More levels, more noise, good for scalping
- **Higher (30m, 1H, 4H)**: Fewer levels, stronger significance, good for swing trading
- **Recommendation for NQ/ES**: 15m or 30m for day trading, 1H for swing trading
**Session Age Threshold** (Default: 2)
- How many sessions before a level is considered "old"
- Lower = more levels classified as old
- Higher = stricter definition of significance
### 📊 Level Display Options
**Show Level Lines**
- Toggle: Display horizontal lines for each level
- **Turn off** if you prefer a cleaner chart and only want the table
**Show Level Labels**
- Toggle: Display price labels on the chart
- **Turn off** for minimal visual clutter
**Label Offset**
- Distance (in bars) from current price bar to place labels
- Increase if labels overlap with price action
**Level Line Width & Style**
- Customize visual appearance
- **Thin solid**: Minimal distraction
- **Thick dashed**: High visibility
### 🎨 Age-Based Color Coding
Customize colors for each age category (high and low separately):
- **New (0-1 sessions)**: Default bright red/green
- **Medium (2-3 sessions)**: Default medium intensity
- **Old (4+ sessions)**: Default dark red/blue
- **Ancient (7+ sessions)**: Default deep purple/teal
**Color Strategy Tips:**
- Keep ancient levels in highly contrasting colors
- Use opacity (transparency) if you want subtler lines
- Match your chart's color scheme for aesthetic coherence
### 🎯 Band Settings
**Band Mode**
- **1st-2nd** (Default): The primary "tunnel" between most recent levels
- **1st-3rd**: Wider band, more room for price action
- **2nd-3rd**: Band between less immediate levels
- **Disabled**: No bands, lines only
**Band Colors & Borders**
- Customize fill color and border separately
- **Tip**: Keep bands very transparent (90-95% transparency) to avoid obscuring price action
### ⚠️ Proximity Alert Settings
**Enable Proximity Alerts**
- Toggle: Turn on/off the warning system
- When enabled, levels within threshold distance show ⚠️ and turn yellow
**Alert Threshold** (Default: 5.0 points)
- Distance in points to trigger the alert
- **For NQ**: 5-10 points is reasonable
- **For ES**: 2-5 points is reasonable
- **For MES/MNQ**: Scale down proportionally
**Alert Highlight Color**
- The color lines/labels turn when proximity is triggered
- Default: Yellow (high visibility)
### 📋 Table Settings
**Show Table**
- Toggle: Display the dashboard table
**Table Location**
- Top Left, Top Right, Bottom Left, Bottom Right
- Choose based on your chart layout and other indicators
**Text Size**
- Tiny, Small, Normal, Large
- **Recommendation**: Normal for 1080p monitors, Small for 4K
**Show % Distance**
- Toggle: Add percentage distance column to table
- Useful for comparing relative distances across different price ranges
**Show Statistics Row**
- Toggle: Show total count of unmitigated highs/lows
- Format: "📊 15↑ / 12↓" (15 unmitigated highs, 12 unmitigated lows)
- Useful for gauging overall market structure
### ⚡ Performance Settings
**Enable Level Cleanup**
- Automatically remove very old levels to maintain performance
- **Keep on** unless you want unlimited history
**Max Lookback Levels** (Default: 10,000)
- Maximum number of levels to track
- 10,000 ≈ 6+ months of 15-minute bars
- **Increase** if you want more history
- **Decrease** if experiencing performance issues
**Max Boxes Per Band** (Default: 245)
- TradingView limit is 500 total boxes
- With 2 bands, 245 each = 490 total (safe maximum)
---
## Best Practices
### 🎯 Position Management
**1. Scaling In Near Old Levels**
```
Price approaching 5-session-old low:
- First position: 30% size at proximity alert (⚠️)
- Second position: 40% size at exact level
- Third position: 30% size if it shows strong rejection
```
**2. Scaling Out Near Ancient Levels**
```
Holding long position, approaching 8-session-old high:
- Exit 50% at proximity alert (⚠️)
- Exit 30% at exact level
- Trail stop on remaining 20%
```
### 🧠 Trading Psychology Integration
Drawing from principles in *The Mountain Is You*, this indicator helps you:
**1. Recognize Self-Sabotage Patterns**
- **The Premature Entry**: Entering before price reaches your planned level
- **Solution**: Set alerts at unmitigated levels, wait for proximity warnings
- **The Profit-Taking Problem**: Exiting too early from fear
- **Solution**: Identify the next unmitigated level and commit to holding until proximity alert
- **The Loss Holding**: Refusing to exit losing trades
- **Solution**: When price breaks through and mitigates your entry level, it's telling you the structure changed
**2. Building Better Habits**
The color-coded age system trains your brain to:
- Respect levels that have proven themselves over time
- Distinguish between noise (new levels) and structure (old levels)
- Make decisions based on objective data, not fear or greed
**3. Emotional Regulation**
The proximity alerts serve as:
- **Circuit breakers** - Forcing you to re-evaluate before dangerous zones
- **Permission to act** - Giving you objective signals to exit without second-guessing
- **Validation** - Confirming when you're in alignment with market structure
### 📝 Pre-Market Routine
**Daily Setup Checklist:**
1. ✅ Identify the 3 nearest unmitigated highs above current price
2. ✅ Identify the 3 nearest unmitigated lows below current price
3. ✅ Note which are ancient (7+) - these are your "no-go" zones
4. ✅ Check the tunnel width (Δ in status row) - tight or wide?
5. ✅ Set alerts at the 1st high and 1st low for proximity warnings
6. ✅ Plan: "If we go up, I exit at ___. If we go down, I enter at ___."
### 🔄 Timeframe Confluence
**Multi-Timeframe Strategy:**
Run the indicator on **three instances**:
- **15-minute** (short-term structure)
- **1-hour** (intermediate structure)
- **4-hour** (major structure)
**Strong Setup**: When all three timeframes show unmitigated levels converging at the same price zone.
**Example:**
- 15m: Old low at 21,400
- 1H: Ancient low at 21,398
- 4H: Ancient low at 21,395
- **Result**: 21,395-21,400 is a monster support zone
### ⚠️ What This Indicator Doesn't Do
**Not a Crystal Ball**
- It doesn't predict where price will go
- It shows you where price *hasn't been* and how long it's been avoided
- The trading decisions are still yours
**Not an Entry Signal Generator**
- It provides context and structure
- You need to combine it with your entry methodology (price action, indicators, order flow, etc.)
**Not Foolproof**
- Ancient levels get broken
- Proximity alerts can trigger early in strong trends
- The market doesn't "owe" you a reversal at any level
---
## Common Scenarios
### Scenario 1: "Level Cluster Ahead"
**Situation**: You're long at 21,400. The table shows:
- 1st High: 21,425 (2 sessions old)
- 2nd High: 21,428 (3 sessions old)
- 3rd High: 21,435 (6 sessions old)
**Interpretation**: There's a resistance cluster just 25-35 points away. The 6-session-old level is particularly significant.
**Action**:
- Set first profit target at 21,420 (before the cluster)
- Set second target at 21,426 (between 1st and 2nd)
- Trail remaining position, but be ready to exit on rejection at 21,435
**Cave Diving Analogy**: You're approaching an overhead section with limited clearance. Lighten your load (reduce position) before entering.
---
### Scenario 2: "Ancient Level Approaches"
**Situation**: The market is grinding higher. You see ⚠️ appear next to a 9-session-old high at 21,500.
**Interpretation**: This level has survived over a week without being touched. Massive potential liquidity zone.
**Action**:
- If long, this is your absolute exit zone. Take profits before or at level.
- If looking to short, wait for clear rejection (price taps and reverses)
- Don't try to buy the breakout until it clearly breaks and retests
**Cave Diving Analogy**: Your dive computer is beeping - you've reached your planned turn-back depth. No matter how interesting it looks ahead, honor your plan.
---
### Scenario 3: "Mitigated Levels Create New Structure"
**Situation**: Price breaks and mitigates the 1st High. The previous 2nd High becomes the new 1st High.
**Interpretation**: The structure just shifted. What was the 2nd level is now most relevant.
**Action**:
- Watch how price reacts to the newly-mitigated level
- If it holds below (acts as resistance), bearish
- If it reclaims and holds above (acts as support), bullish
- The NEW 1st High is your next target/resistance
**Cave Diving Analogy**: You've passed through a restriction - the cave layout ahead is different now. Update your mental map.
---
### Scenario 4: "Tight Tunnel, Upcoming Breakout"
**Situation**: The Δ in the status row shows 3.25 points (very tight). Bands are converging.
**Interpretation**: Price is consolidating between very close unmitigated levels. Breakout likely.
**Action**:
- Don't try to predict direction
- Set alerts above 1st High and below 1st Low
- When break occurs, trade the retest
- Expect volatility - use wider stops
**Cave Diving Analogy**: You're in a narrow passage. Movement will be sudden and directional once it starts.
---
### Scenario 5: "Imbalanced Structure"
**Situation**: The statistics row shows "📊 22↑ / 7↓"
**Interpretation**: There are many more unmitigated highs than lows. This suggests:
- Price has been declining (hitting lows, leaving highs behind)
- Potential bullish reversal zone (lots of overhead supply mitigated)
- Or continued bearish structure (resistance everywhere above)
**Action**:
- Look at the age of those 22 highs
- If mostly new (0-2 sessions): Just a recent downmove, not significant yet
- If many old/ancient: Strong overhead resistance, be cautious on longs
- Compare to price action: Is price respecting the remaining lows?
**Cave Diving Analogy**: You've swam deeper than your starting point - most of your markers are above you now. Are you planning the ascent or going deeper?
---
## Final Thoughts: The Philosophy
This indicator is built on a simple but powerful principle: **The market has memory, and that memory has weight.**
Every unmitigated level represents:
- Liquidity left behind
- Orders waiting to be filled
- Institutional interest potentially parked
- Psychological significance for participants
The longer a level remains unmitigated, the more "charged" it becomes. When price finally revisits it, something significant usually happens - either a strong reversal or a definitive break.
Your job as a trader isn't to predict which outcome will occur. Your job is to:
1. **Recognize** when you're approaching these charged zones
2. **Respect** them by adjusting position size and risk
3. **React** appropriately based on how price behaves at them
4. **Remember** that ancient levels (like ancient wisdom) deserve extra reverence
The Cave Diving Framework embedded in this indicator serves as a constant reminder: Trading, like cave diving, requires rigorous respect for environmental hazards, meticulous planning, and the discipline to turn back when your limits are reached.
**Every proximity alert is the market asking you**: *"Do you really want to go deeper?"*
Sometimes the answer is yes - when your setup, confluence, and risk management all align.
Often, the answer should be no - and that's the trader avoiding the accident that would have happened to the gambler.
---
### 🎯 Quick Reference Card
**Color System:**
- 🟢 Bright colors = New (0-1 sessions) = Shallow water
- 🟡 Medium colors = Medium (2-3 sessions) = Penetration depth
- 🔴 Dark colors = Old (4-6 sessions) = Deep dive zone
- 🟣 Deep dark colors = Ancient (7+ sessions) = Overhead environment
**Symbols:**
- ↑ ↑↑ ↑↑↑ ↑↑↑↑ ↑↑↑↑↑ = High levels (1st through 5th)
- ↓ ↓↓ ↓↓↓ ↓↓↓↓ ↓↓↓↓↓ = Low levels (1st through 5th)
- ⚠️ = Proximity alert (danger zone)
- 🟢 = Bullish structure
- 🔴 = Bearish structure
- Δ = Tunnel width (distance between 1st high and 1st low)
**Critical Rules:**
1. Never fight ancient levels (7+ sessions)
2. Respect proximity alerts (⚠️)
3. Scale out near old/ancient resistance
4. Wait for confluence when entering
5. Let mitigated levels prove their new role
---
**Remember**: The indicator gives you structure. The trading edge comes from your discipline in respecting that structure.
Trade safe, trade smart, and always know your exit before your entry. 🎯
---
*"You don't become your best self by denying your patterns. You become your best self by recognizing them, understanding them, and choosing differently." - Adapted from The Mountain Is You*
In trading: You don't become profitable by ignoring market structure. You become profitable by recognizing it, understanding it, and choosing your entries accordingly.
