Revolution Entry IndicatorSimple entry indicator where the entry is decided by the relative strength of each individual candle.
Recherche dans les scripts pour "entry"

RSI-MTF-Histo-EntryThis indicator gives a histogram of RSI in relation to an ema of the RSI.
The histogram is then smoothed to reduce false signals.
The actualiteit RSI line with overbought/overvols signals can be added or omitted as preferred.
The background can be color coded if the RSI is above or below 50.
Version 2. Added support for MTF. Longer timesframes (1h-3h) tend to give better entry results.
As an example the indicator was added two times, one for the current timeframe and one for a longer timeframe.

T3 Entry and ExitI made this indicator to give clear entry and exit signals plus give signals when I should add onto my trades with no repainting!! The bottom indicator is set to 34 (the default settings). This gives me my entries and exits as shown by the green and red arrow. I use a 14 period setting for my signals to add onto my trade. If I am in a long trade as shown in the chart above and the 14 period T3EE has a fast line cross under the slow line and then a cross back over and I have not had my signal to close trade yet on the 34 period T3EE I will add to my long position. I cut the size of they order in half with each addition to my position. So if I entered with 2 lots I would add 1 lot with my first signal to add (shown by orange arrow) and then .5 lots with the second signal to add to my position and so on until it is time to close the position. If you day trade avoid entering positions between 4pm est and 9pm est. and the larger the ranges and the more trendy the market the better. Good Luck!!!
If you have any questions let me know :)

Price Action + Support/Resistance with LabelsEntry Conditions:
Long Entry (BUY): Based on the bullish engulfing pattern and price being above the resistance level.
Short Entry (SELL): For demonstration, the short entry condition is set as price being below the support level and a bullish candle in the previous bar. You can modify this logic for your own use case.
Stop Loss and Take Profit:
Stoploss is plotted at the calculated stop loss level.
Target is plotted at the calculated take profit level.
Labels:
For long trades, labels are added with "BUY", "STOPLOSS", and "TARGET".
For short trades (if enabled), labels are added with "SELL", "STOPLOSS", and "TARGET".
Labels are placed using label.new at specific locations on the chart (above or below bars).
Alert Conditions:
Alerts are created for both long and short entry signals so you can get notified when the entry conditions are met.
How it works:
BUY label will appear below the bar when a long entry condition is met.
SELL label will appear above the bar when a short entry condition is met.
STOPLOSS and TARGET labels will appear at their respective levels when an entry signal is triggered.
The labels will appear on the chart to give you a clear visual cue of the entry, stop loss, and take profit levels.
How to Use:
Copy the script into your Pine Editor on TradingView and apply it to your chart.
Observe the labels that show up on the chart:
"BUY" will appear below the bar when long conditions are met.
"SELL" will appear above the bar when short conditions are met (if using short logic).
"STOPLOSS" will be plotted at the stop loss level.
"TARGET" will be plotted at the take profit level.
Optional Customization:
You can modify the short entry condition based on your preferred method.
You can adjust the length for the support/resistance calculation, the stopLossRR, and other parameters to fine-tune the strategy for Nifty 50 or any other asset.
Let me know if you have any further questions or need additional modifications!

Raeinex Momentum Liquidity IndexEntry arrow signals with volumetric momentum (buying and selling pressure) and the possibility to use all entry signals as liquidity area for price retest.

Entry / TP / SL Alert Bands (Simple & Stable)
Get an alert before you reach your take profit or stop loss. Set as a percentage over the distance to your stop loss and take profit and improve your Money Management

ENTRY CONFIRMATION V2An indicator from candle man. Helps determine whether supply and demand zone are truly supply or demand.

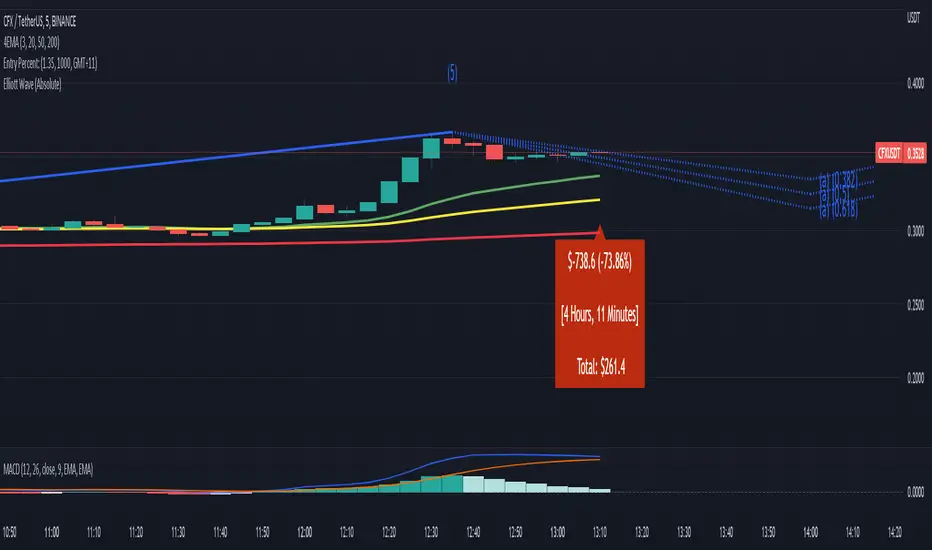
Entry Percent: EssamThis Pine Script code is designed to perform the task of computing and showcasing the profit percentage, profit value, and the duration for which a specific asset is held, all in real-time. The script effectively leverages the built-in resources to provide a seamless and robust experience, as it presents the calculated figures in an easily readable format on the chart, without causing any lag or disruptions to the chart.
[MV] %B with SMA + Volume Based Colored Bars
Entry Signal when %B Crosses with SMA and this is more meaningful if it supports colored bars.
Black Bar when prices go down and volume is bigger than 150% of its average, that indicates us price action is supported by a strong bearish volume
Blue Bar when prices go up and volume bigger than 150% of its average, that indicates us price action is supported by a strong bullish volume
VBC author @KIVANCfr3762
FX Sniper: T3-CCI Strategy - With 100 IndicatorsEntry signal when moving above -100, sell signal when going below 100
Amazing Crossover SystemEntry Rules
BUY when the 5 EMA crosses above the 10 EMA from underneath and the RSI crosses above the 50.0 mark from the bottom.
SELL when the 5 EMA crosses below the 10 EMA from the top and the RSI crosses below the 50.0 mark from the top.
Make sure that the RSI did cross 50.0 from the top or bottom and not just ranging tightly around the level.
How to setup Alert:
1) Add the Amazing Crossover System to your chart via Indicators
2) Find your currency pair
3) Set the timeframe on the chart to 1 hour
4) Press 'Alt + A' (create alert shortcut)
5) Set the following criteria for the alert:
Condition = 'Amazing Crossover System', Plot, ' BUY Signal'
The rest of the alert can be customized to your preferences
5) Repeat steps 1 - 4, but set the Condition = 'Amazing Crossover System', Plot, ' SELL Signal'

SEPA Sell Signal IndicatorSEPA Sell Signal Indicator - Documentation
Overview
A comprehensive exit signal indicator designed to work alongside the main SEPA (Stage, EMA, Price Action) indicator. It detects entry points via SEPA base breakouts and provides intelligent sell signals to protect profits and limit losses.
Core Features
Entry Detection
Automatically detects SEPA base breakout patterns
Tracks entry price and calculates swing low reference
Monitors position status (LONG/FLAT)
5 Sell Triggers
Price < EMA50 (Technical weakness)
Protected by EMA10 system (see below)
Trend Broken (Price < EMA150 AND EMA200)
Major trend reversal signal
Not protected - always fires
EMA Cross (EMA50 < EMA150)
Death cross indicating momentum shift
Not protected - always fires
Swing Low Broken (Price < Previous Swing Low)
Hard stop loss trigger
Lookback period: 10 bars (adjustable 5-50)
Not protected - always fires
Relative Strength Negative (RS vs NIFTY500 < 0)
Stock underperforming benchmark index
Based on 21-period EMA comparison
Not protected - always fires
EMA10 Protection System (Refinement Feature)
Purpose
Prevents premature exits during healthy pullbacks in strong uptrends.
Protection Criteria (All must be true)
✅ Stock in uptrend (EMA50 > EMA150 > EMA200)
✅ Price above EMA10
✅ Price above EMA50
✅ Only protects Condition 1 (Price < EMA50)
Two-Stage Warning System
Stage 1: Yellow "CAUTION" Signal
Appears when Condition 1 triggers but protection is active
Grace period begins (default: 5 bars)
Allows time for price to recover
Stage 2: Red "SELL" Signal
Fires when ANY of these occur:
Warning timer expires (5/5 bars)
Price drops below EMA10
Price drops below EMA50
Uptrend ends
Any other sell condition (2-5) triggers
Settings
Enable EMA10 Protection: ON/OFF toggle (default: ON)
Protection Time Limit: 1-20 bars (default: 5)
Visual Elements
Chart Signals
🔴 Red Triangle (SELL): Confirmed sell signal - exit position
🟡 Yellow Circle (CAUTION): Warning - monitor closely
🟢 Green Background Tint: Currently in position
Information Tables
Top Right - Sell Conditions Table
Shows real-time status of all 5 conditions
✓ (Green) = Condition NOT met (safe)
✓ (Red) = Condition met (danger)
⚠ (Yellow) = Warning active (monitoring)
Displays EMA10 protection status (ON/OFF)
Shows warning timer (e.g., "3/5")
Bottom Right - Position Details (when in position)
Entry price
Swing low level
Relative strength value (color-coded)
Current P&L percentage
Bottom Right - Status (when flat)
Shows "NO POSITION"
Indicates waiting for "BASE BREAKOUT"
Alert System
Entry Signal: SEPA base breakout detected
Warning Alert: Caution - price below EMA50 but protected
EMA50 Break: Sell confirmed after protection expires
Trend Break: Major reversal - exit immediately
EMA Cross: Death cross - exit immediately
Swing Low Break: Hard stop - exit immediately
RS Negative: Underperformance - exit immediately
Configuration Parameters
ParameterDefaultRangeDescriptionEMA 10101-50Fast moving average for protectionEMA 50501-200Primary trend indicatorEMA 1501501-300Medium-term trendEMA 2002001-500Long-term trendSwing Low Lookback105-50Bars to find previous swing lowRS EMA215-50Period for relative strength calcBenchmarkCNX500-Index for RS comparisonProtection Time Limit51-20Max bars for warning stateTable Text Size1 (Small)0-40=Tiny, 4=HugeEMA10 ProtectionONON/OFFEnable/disable protection
Trading Workflow
Entry: Indicator detects SEPA base breakout
Monitoring: Track 5 sell conditions in real-time
Warning: Yellow CAUTION if minor weakness (Condition 1 only)
Grace Period: 5 bars to recover or confirm breakdown
Exit: Red SELL signal when conditions confirm weakness
Reset: Returns to flat, waits for next base breakout
Key Advantages
✅ Selective Protection: Only protects shallow pullbacks, not real breakdowns
✅ Time-Limited: Won't delay exits indefinitely (5-bar max)
✅ Multi-Layered: 5 independent sell conditions
✅ Visual Clarity: Color-coded signals and comprehensive tables
✅ Customizable: All parameters adjustable for your style
✅ Alert System: Never miss a critical signal
Philosophy
The indicator balances two competing goals:
Stay in winning trades during healthy pullbacks
Exit quickly when trends genuinely reverse
The refined EMA10 protection system achieves this by giving breathing room for minor dips while ensuring swift exits on confirmed weakness.

Advanced Concept V4 Change your trading time zone to New York . To maximize readiness for institutional trading setups based on the prescribed models, traders should set alarms for specific times in the New York Time Zone (EST/EDT), which is generally 10.5 hours behind IST.
Asian Stop Hunt Model
The Stop Hunt Model is a liquidity-based strategy designed to exploit market stop-loss sweeps by aligning with the IPDA daily bias. The core idea is to wait for price to sweep the engineered liquidity of the Asian Session High or Low (after 10:30 AM IST). Once the sweep occurs, the trader confirms the market's true direction via a Change of Character (CHoCH) on the lower timeframe. The entry is then taken only on a retest of the resulting price inefficiency, specifically a Balanced Price Range (BPR) or imbalance, which represents the institutional entry point. By targeting the next major liquidity pool with a minimum 1:3 risk-to-reward ratio, the model prioritizes discipline and quality over frequent trading.
The New York Open Model
The New York Open Model is an index-focused strategy (SPX500, NAS100, US30) that trades solely during the New York Session (9:30 AM – 12:30 PM NYT). It establishes a Range Zone high and low from midnight until the open, treating these boundaries as institutional liquidity targets. Execution is triggered by a mandatory liquidity sweep of one side of this range, followed by a confirming Change of Character (CHoCH) on the 1-minute chart. Entry is taken precisely on the retest of a resulting price inefficiency (like an FVG), aiming for the opposite side of the session range, prioritizing simplicity, timing, and controlled risk over external biases like IPDA.
The ATM Strategy
The ATM Strategy is a high-precision, New York-session trading model designed to capture institutional liquidity moves using the IPDA directional bias. The strategy operates by first defining a Range Zone (00:00 to 8:30 AM NY time) where high and low boundaries act as liquidity targets. Execution is restricted to the Trading Zone (8:30AM to 12:30 PM NY time) and is only triggered when price executes a mandatory liquidity sweep of one range boundary that aligns with the IPDA bias. This sweep must then be confirmed on the 1-minute chart by a Change of Character (CHoCH). Final entry is taken on the retest of a resulting price inefficiency (like an FVG or BPR), with targets set at session highs or lows, ensuring institutional-style execution with high clarity and discipline.
The Central Bank Dealer Range (CBDR)
The Central Bank Dealer Range (CBDR) model is a disciplined, institutional trading strategy used on the 15-minute chart, primarily focusing on London Session liquidity for major currency pairs. The core idea is to align with Interbank Price Delivery Algorithm (IPDA) bias, which dictates a mandatory liquidity sweep (a false breakout of the previous day's high or low) must occur first. Following this sweep, a visible price imbalance (Fair Value Gap) must form within the London Session. Entry is strictly taken only on the retest of this imbalance zone, confirming institutional order flow, with a fixed target at the opposite boundary of the previous day's range.

Dow Theory Cockpit1. Evolution History
The system has reached its final form through five distinct development phases:
Phase 1: Logic Development (V1–V6)
Established four core logics: BREAK and DIP (Dow Theory), SNIPER (Reversal), and PUSH (Trend continuation).
Implemented the Multi-Timeframe (MTF) panel and Market Scanner.
Phase 2: Strategy Transition (V7–V9)
Integrated backtesting features, but found the Pine Script calculation load too heavy for real-time charting.
Phase 3: Optimization & Performance (V10–V11)
Prioritized smooth real-time execution by returning to a lightweight indicator format.
Introduced the on-chart stats panel for Win Rate and P&L tracking.
Phase 4: Visual Completion (V12–V13)
High-Vis Fib: Bold orange lines highlighting the Golden Zone (38.2%/61.8%).
Visual Zones: Introduced Green and Red bands for intuitive trade tracking.
Phase 5: Smart Adjust Implementation (V14 - Current)
Barrier Avoidance: Automatically detects nearby Support/Resistance boxes and shortens the TP to secure profits before a potential reversal.
Dynamic RR Optimization: Automatically adjusts the SL in tandem with the shortened TP to maintain a healthy Risk-Reward ratio.
2. Specifications
Name: Dow Theory Cockpit
Format: Indicator
Trading Style: Scalping to Day Trading
Timeframes: 5M, 15M (Recommended), 1H
Assets: All pairs (Gold, Crypto, Forex, Indices)
3. Features
① Quad-Logic Entry Signals
🎯 SNIPER: Reversal logic targeting "Tops and Bottoms" when the market is overextended.
🌊 DIP: Trend-following logic for "Deep Pullbacks" with clean Moving Average alignment.
⚡ PUSH: Scalping logic for "Shallow Pullbacks" during high-momentum trends.
🚀 BREAK: Classic Dow Theory momentum entry on recent High/Low breakouts.
② Visual Analysis Tools
S/R BOX: Displays key price levels as shaded zones to account for market noise and wick volatility.
High-Vis Auto Fib: Automatically plots Fibonacci levels, highlighting the Golden Zone with bold lines.
③ Bulletproof Money Management
Calculated Lot Size: Displays the precise lot size based on your account balance and Risk % directly on the signal label.
TP/SL Zones: Dynamic Green and Red bands show exactly where your profit and loss targets lie.
④ Smart Adjust Function (NEW)
Logic: Automatically scans for strong S/R walls near your entry.
Normal Condition: Displays TP/SL at your default Risk-Reward ratio.
Wall Detected: Automatically pulls the TP to the edge of the barrier and tightens the SL to maintain the ratio.
Alert: A "⚠️Adj" warning appears on the label when this adjustment is active.
⑤ Integrated Info Panel
Main Panel: Trends across all timeframes, real-time Win Rate, and Period Net P&L.
Scanner: Constant monitoring of Gold/JPY/BTC and major US/JP economic data.
4. How to Use
Configuration: In the settings under , input your balance and Risk %. Set your start date in .
Entry Decision: Wait for the "★ BUY" or "★ SELL" label.
"⚠️Adj" displayed: The system has detected a nearby barrier and narrowed the TP/SL for safety. This results in a higher win rate with smaller gains.
No warning: No barriers detected. Targets the default wide Risk-Reward ratio.
Execution: Enter using the exact Lot size on the label. Set your Limit/Stop orders at the provided TP/SL prices.
Exit: The trade concludes when the price reaches the Green or Red zone. Smart Adjust ensures you exit the market before a potential bounce.
1. 大幅なアップデート履歴 (Evolution History)
このシステムは、以下の5つのフェーズを経て完成しました。
フェーズ1:ロジック構築期 (V1〜V6)
ダウ理論に基づく「BREAK」「DIP」に加え、逆張り「SNIPER」、順張り追撃「PUSH」の4つのロジックを搭載。
マルチタイムフレーム(MTF)パネル、市場監視スキャナーの実装。
フェーズ2:ストラテジー化への挑戦 (V7〜V9)
バックテスト機能を搭載したが、Pine Scriptの計算負荷増大によりチャート動作が重くなる問題が発生。
フェーズ3:軽量化と原点回帰 (V10〜V11)
**「実戦での快適さ」**を最優先し、indicator 形式へ戻して超軽量化。
期間損益や勝率を、チャート上のパネルで簡易確認できる仕様に変更。
フェーズ4:視認性の完成 (V12〜V13)
High-Vis Fib: フィボナッチの重要ライン(38.2%/61.8%)を太いオレンジ実線で強調。
Visual Zone: トレード中、チャート上に「緑(利益)/赤(損失)」の帯を表示し、直感的な判断を可能に。
フェーズ5:スマート・アジャスト実装 (V14 - Current)
障害物回避機能: エントリー方向の直近に「逆側のレジサポBOX(壁)」がある場合、TPをその手前に自動短縮し、反発による含み益消滅リスクを回避。
RR自動最適化: TPの短縮に合わせて、最低限のリスクリワード(RR)を維持するようSLも自動調整する機能を搭載。
2. 全体の仕様 (Specifications)
名称: Dow Theory Cockpit
形式: インジケーター (Indicator)
※TradingViewの「ストラテジーテスター」タブは使用しません。
推奨スタイル: スキャルピング 〜 デイトレード
推奨時間足: 5分足、15分足(推奨)、1時間足
通貨ペア: 全通貨対応(Gold, Crypto, Forex, Index)
3. 特徴と機能 (Features)
① 4つの「高期待値」エントリーロジック
相場の状況に合わせて最適なサインが点灯します。
🎯 SNIPER: 行き過ぎた相場の反転(天底)を狙う逆張り。
🌊 DIP: 移動平均線の並びが良い状態での「深い押し目」を拾う順張り。
⚡ PUSH: 強いトレンド(ADX上昇中)の「浅い押し目」で飛び乗るスキャルピング用。
🚀 BREAK: ダウ理論の基本、直近高値・安値ブレイクでのエントリー。
② 視覚的環境認識ツール
レジサポ BOX: 重要価格帯を「面(ボックス)」で表示。ヒゲのダマシを許容します。
High-Vis Auto Fib: 直近の波を検知し、38.2%/61.8%(ゴールデンゾーン)を太線で強調表示。
③ 鉄壁の資金管理 (Money Management)
推奨ロット表示: 口座資金と許容リスク(%)に基づき、適正ロット数を自動計算して表示します。
TP/SL ゾーン: エントリー中、チャート上に「利確までの緑の帯」と「損切までの赤の帯」が表示され、価格の進行度合いが一目で分かります。
④ スマート・アジャスト機能 (Smart Adjust) ★NEW
機能: エントリー時、目標地点の手前に「強力なレジサポBOX」があるかを自動検知します。
動作:
通常時: 設定通りのRR(2.5倍など)でTP/SLを表示。
壁がある時: **「壁の手前」**にTPを引き下げ、それに合わせてSLも浅く調整します。
表示: 調整が行われた場合、ラベルに 「⚠️Adj(調整済み)」 と警告が出ます。
⑤ 情報集約パネル
Main Panel: 全時間足のトレンド方向、直近の勝率、期間内の純損益を表示。
Scanner: Gold / JPY / BTC の動向と、日米経済指標を常時監視。
4. 使い方 (How to Use)
STEP 1: 初期設定
インジケーター設定の 【F. 資金管理】 を開き、口座資金 と リスク(%) を入力します。
【T. バックテスト期間】 で損益計算を開始したい日付を設定します。
STEP 2: エントリー判断
チャートに 「★ BUY」 または 「★ SELL」 のラベルが出現するのを待ちます。
ラベルの確認:
「⚠️Adj」 と出ている場合 → 「近くに壁があるため、TP/SLを狭く調整しました」という意味です。勝率は上がりますが、値幅は小さくなります。
何も出ていない場合 → 「障害物なし。通常のRRで大きく狙います」という意味です。
STEP 3: 注文 (Execution)
ラベルの数値を信頼して注文を出します。
Lot: 表示された数量を入力。
TP/SL: 表示された価格に指値・逆指値を置く。
STEP 4: 決済 (Exit)
チャート上の 「緑の帯(TP)」 か 「赤の帯(SL)」 にローソク足が到達したら決済です。
**「スマートアジャスト」により、壁の手前で利確設定されているため、「反発して戻ってくる前に逃げ切る」**ことができます。

Dow Theory Cockpit [Final Fixed V15]1. Evolution History
The system has reached its final form through five distinct development phases:
Phase 1: Logic Development (V1–V6)
Established four core logics: BREAK and DIP (Dow Theory), SNIPER (Reversal), and PUSH (Trend continuation).
Implemented the Multi-Timeframe (MTF) panel and Market Scanner.
Phase 2: Strategy Transition (V7–V9)
Integrated backtesting features, but found the Pine Script calculation load too heavy for real-time charting.
Phase 3: Optimization & Performance (V10–V11)
Prioritized smooth real-time execution by returning to a lightweight indicator format.
Introduced the on-chart stats panel for Win Rate and P&L tracking.
Phase 4: Visual Completion (V12–V13)
High-Vis Fib: Bold orange lines highlighting the Golden Zone (38.2%/61.8%).
Visual Zones: Introduced Green and Red bands for intuitive trade tracking.
Phase 5: Smart Adjust Implementation (V14 - Current)
Barrier Avoidance: Automatically detects nearby Support/Resistance boxes and shortens the TP to secure profits before a potential reversal.
Dynamic RR Optimization: Automatically adjusts the SL in tandem with the shortened TP to maintain a healthy Risk-Reward ratio.
2. Specifications
Name: Dow Theory Cockpit
Format: Indicator
Trading Style: Scalping to Day Trading
Timeframes: 5M, 15M (Recommended), 1H
Assets: All pairs (Gold, Crypto, Forex, Indices)
3. Features
① Quad-Logic Entry Signals
🎯 SNIPER: Reversal logic targeting "Tops and Bottoms" when the market is overextended.
🌊 DIP: Trend-following logic for "Deep Pullbacks" with clean Moving Average alignment.
⚡ PUSH: Scalping logic for "Shallow Pullbacks" during high-momentum trends.
🚀 BREAK: Classic Dow Theory momentum entry on recent High/Low breakouts.
② Visual Analysis Tools
S/R BOX: Displays key price levels as shaded zones to account for market noise and wick volatility.
High-Vis Auto Fib: Automatically plots Fibonacci levels, highlighting the Golden Zone with bold lines.
③ Bulletproof Money Management
Calculated Lot Size: Displays the precise lot size based on your account balance and Risk % directly on the signal label.
TP/SL Zones: Dynamic Green and Red bands show exactly where your profit and loss targets lie.
④ Smart Adjust Function (NEW)
Logic: Automatically scans for strong S/R walls near your entry.
Normal Condition: Displays TP/SL at your default Risk-Reward ratio.
Wall Detected: Automatically pulls the TP to the edge of the barrier and tightens the SL to maintain the ratio.
Alert: A "⚠️Adj" warning appears on the label when this adjustment is active.
⑤ Integrated Info Panel
Main Panel: Trends across all timeframes, real-time Win Rate, and Period Net P&L.
Scanner: Constant monitoring of Gold/JPY/BTC and major US/JP economic data.
4. How to Use
Configuration: In the settings under , input your balance and Risk %. Set your start date in .
Entry Decision: Wait for the "★ BUY" or "★ SELL" label.
"⚠️Adj" displayed: The system has detected a nearby barrier and narrowed the TP/SL for safety. This results in a higher win rate with smaller gains.
No warning: No barriers detected. Targets the default wide Risk-Reward ratio.
Execution: Enter using the exact Lot size on the label. Set your Limit/Stop orders at the provided TP/SL prices.
Exit: The trade concludes when the price reaches the Green or Red zone. Smart Adjust ensures you exit the market before a potential bounce.
1. 大幅なアップデート履歴 (Evolution History)
このシステムは、以下の5つのフェーズを経て完成しました。
フェーズ1:ロジック構築期 (V1〜V6)
ダウ理論に基づく「BREAK」「DIP」に加え、逆張り「SNIPER」、順張り追撃「PUSH」の4つのロジックを搭載。
マルチタイムフレーム(MTF)パネル、市場監視スキャナーの実装。
フェーズ2:ストラテジー化への挑戦 (V7〜V9)
バックテスト機能を搭載したが、Pine Scriptの計算負荷増大によりチャート動作が重くなる問題が発生。
フェーズ3:軽量化と原点回帰 (V10〜V11)
**「実戦での快適さ」**を最優先し、indicator 形式へ戻して超軽量化。
期間損益や勝率を、チャート上のパネルで簡易確認できる仕様に変更。
フェーズ4:視認性の完成 (V12〜V13)
High-Vis Fib: フィボナッチの重要ライン(38.2%/61.8%)を太いオレンジ実線で強調。
Visual Zone: トレード中、チャート上に「緑(利益)/赤(損失)」の帯を表示し、直感的な判断を可能に。
フェーズ5:スマート・アジャスト実装 (V14 - Current)
障害物回避機能: エントリー方向の直近に「逆側のレジサポBOX(壁)」がある場合、TPをその手前に自動短縮し、反発による含み益消滅リスクを回避。
RR自動最適化: TPの短縮に合わせて、最低限のリスクリワード(RR)を維持するようSLも自動調整する機能を搭載。
2. 全体の仕様 (Specifications)
名称: Dow Theory Cockpit
形式: インジケーター (Indicator)
※TradingViewの「ストラテジーテスター」タブは使用しません。
推奨スタイル: スキャルピング 〜 デイトレード
推奨時間足: 5分足、15分足(推奨)、1時間足
通貨ペア: 全通貨対応(Gold, Crypto, Forex, Index)
3. 特徴と機能 (Features)
① 4つの「高期待値」エントリーロジック
相場の状況に合わせて最適なサインが点灯します。
🎯 SNIPER: 行き過ぎた相場の反転(天底)を狙う逆張り。
🌊 DIP: 移動平均線の並びが良い状態での「深い押し目」を拾う順張り。
⚡ PUSH: 強いトレンド(ADX上昇中)の「浅い押し目」で飛び乗るスキャルピング用。
🚀 BREAK: ダウ理論の基本、直近高値・安値ブレイクでのエントリー。
② 視覚的環境認識ツール
レジサポ BOX: 重要価格帯を「面(ボックス)」で表示。ヒゲのダマシを許容します。
High-Vis Auto Fib: 直近の波を検知し、38.2%/61.8%(ゴールデンゾーン)を太線で強調表示。
③ 鉄壁の資金管理 (Money Management)
推奨ロット表示: 口座資金と許容リスク(%)に基づき、適正ロット数を自動計算して表示します。
TP/SL ゾーン: エントリー中、チャート上に「利確までの緑の帯」と「損切までの赤の帯」が表示され、価格の進行度合いが一目で分かります。
④ スマート・アジャスト機能 (Smart Adjust) ★NEW
機能: エントリー時、目標地点の手前に「強力なレジサポBOX」があるかを自動検知します。
動作:
通常時: 設定通りのRR(2.5倍など)でTP/SLを表示。
壁がある時: **「壁の手前」**にTPを引き下げ、それに合わせてSLも浅く調整します。
表示: 調整が行われた場合、ラベルに 「⚠️Adj(調整済み)」 と警告が出ます。
⑤ 情報集約パネル
Main Panel: 全時間足のトレンド方向、直近の勝率、期間内の純損益を表示。
Scanner: Gold / JPY / BTC の動向と、日米経済指標を常時監視。
4. 使い方 (How to Use)
STEP 1: 初期設定
インジケーター設定の 【F. 資金管理】 を開き、口座資金 と リスク(%) を入力します。
【T. バックテスト期間】 で損益計算を開始したい日付を設定します。
STEP 2: エントリー判断
チャートに 「★ BUY」 または 「★ SELL」 のラベルが出現するのを待ちます。
ラベルの確認:
「⚠️Adj」 と出ている場合 → 「近くに壁があるため、TP/SLを狭く調整しました」という意味です。勝率は上がりますが、値幅は小さくなります。
何も出ていない場合 → 「障害物なし。通常のRRで大きく狙います」という意味です。
STEP 3: 注文 (Execution)
ラベルの数値を信頼して注文を出します。
Lot: 表示された数量を入力。
TP/SL: 表示された価格に指値・逆指値を置く。
STEP 4: 決済 (Exit)
チャート上の 「緑の帯(TP)」 か 「赤の帯(SL)」 にローソク足が到達したら決済です。
**「スマートアジャスト」により、壁の手前で利確設定されているため、「反発して戻ってくる前に逃げ切る」**ことができます。

HOHO Oscillator Squeeze With AGAIG TurnsHOHO OSCILLATOR SQUEEZE WITH AGAIG TURN DETECTION
═════════════════════════════════════════════════════════════
OVERVIEW
This powerful indicator combines three proven trading concepts into one visually stunning, highly accurate momentum and trend analysis tool:
• HOHO (Hump Oscillator) - Multi-timeframe momentum oscillator
• Squeeze Indicator - Bollinger Bands/Keltner Channel volatility compression detector
• AGAIG (As Good As It Gets) Turn Detection - Intelligent price reversal identification
The result is a comprehensive trading system that identifies high-probability entry and exit points with exceptional visual clarity.
═════════════════════════════════════════════════════════════
KEY FEATURES
HOHO OSCILLATOR
The foundation of this indicator is the Hump Oscillator, which creates distinctive wave patterns ("humps") above and below the zero line. These colorful columns provide instant visual feedback on momentum direction and strength:
• Fast oscillator (thin columns) - Responsive to immediate price action
• Slow oscillator (wide columns) - Confirms underlying trend momentum
• Color-coded bars shift from bright (strong momentum) to dark (weakening momentum)
• Fully customizable MA types (EMA/SMA) and lengths
SQUEEZE DETECTION
Integrated Bollinger Band and Keltner Channel analysis identifies volatility compression:
• Yellow zero-line dots signal active squeeze conditions
• Optional yellow background highlights compression zones
• Anticipates explosive breakout moves
• Adjustable BB and KC parameters for different markets and timeframes
AGAIG TURN DETECTION
Intelligent price reversal identification based on the "As Good As It Gets" methodology:
• Automatically identifies significant market turning points
• Adjustable sensitivity via "Turn Detection Length" (lower = more signals, higher = fewer signals)
• Strength filter ensures only quality setups are marked (1-10 scale)
• Eliminates noise and false signals common in traditional pivot indicators
VISUAL SIGNALS
• BUY arrows (green triangles) mark bullish reversal opportunities
• SELL arrows (red triangles) mark bearish reversal opportunities
• Text labels positioned for optimal readability
• All arrows appear at actual turning points with configurable lookback offset
FLEXIBLE CUSTOMIZATION
• Choose between EMA or SMA for all moving average calculations
• Adjustable oscillator lengths for different trading styles
• Configurable turn detection sensitivity
• Optional bar coloring based on Fast or Slow momentum
• Clean, professional visual design
═════════════════════════════════════════════════════════════
HOW TO USE
ENTRY SIGNALS
Look for BUY/SELL arrows combined with:
1. Squeeze conditions (yellow markers) for highest-probability setups
2. Oscillator color confirmation (green for longs, red for shorts)
3. Turn strength that meets your minimum requirements
TREND CONFIRMATION
• Strong green humps = bullish momentum building
• Strong red humps = bearish momentum building
• Oscillator crossing zero = momentum shift
• Color transitions = momentum strengthening or weakening
VOLATILITY ANALYSIS
• Yellow zero-line dots = consolidation/squeeze active
• Expansion after squeeze = high-probability breakout opportunity
• Combine with turn arrows for precise entry timing
PARAMETER TUNING
For scalping/day trading (5m-15m charts):
• Turn Detection Length: 3-5
• Turn Strength: 2-4
For swing trading (1H-4H charts):
• Turn Detection Length: 5-8
• Turn Strength: 3-5
For position trading (Daily charts):
• Turn Detection Length: 8-15
• Turn Strength: 5-7
═════════════════════════════════════════════════════════════
CREDITS & ATTRIBUTION
This indicator builds upon the excellent work of:
• HOHO (Hump Oscillator) - Original concept from ThinkorSwim community
• Squeeze Indicator - Based on TTM Squeeze by John Carter
• AGAIG (As Good As It Gets) - Turn detection methodology by NPR21
Converted and enhanced for TradingView with permission from the trading community.
═════════════════════════════════════════════════════════════
BEST PRACTICES
✓ Use on liquid markets (major indices, forex pairs, crypto)
✓ Combine with support/resistance levels for confluence
✓ Wait for oscillator color confirmation before entry
✓ Higher turn strength settings = fewer but higher-quality signals
✓ Squeeze breakouts offer exceptional risk/reward opportunities
✓ Practice proper risk management and position sizing
✗ Don't trade every arrow - wait for confluence
✗ Don't ignore the oscillator colors - they show momentum health
✗ Don't use overly sensitive settings in choppy markets
✗ Don't trade counter to the oscillator trend without strong confirmation
═════════════════════════════════════════════════════════════
WHAT MAKES THIS INDICATOR UNIQUE
Unlike standalone momentum oscillators or simple pivot indicators, this tool synthesizes three proven methodologies into a single, coherent visual system. The combination of momentum analysis (HOHO), volatility detection (Squeeze), and intelligent turn identification (AGAIG) provides traders with a comprehensive view of market conditions and high-probability trading opportunities.
The indicator's visual design uses color psychology and positioning to make complex market analysis instantly understandable at a glance - critical for fast-moving markets and quick decision-making.
═════════════════════════════════════════════════════════════
SUITABLE FOR
• Day traders on 5m-30m timeframes
• Swing traders on 1H-Daily timeframes
• Scalpers seeking momentum confirmation
• Options traders identifying reversal points
• Futures traders (especially /ES, /NQ, /YM)
• Forex traders on major pairs
• Cryptocurrency traders

Nef33 Forex & Crypto Trading Signals PRO
1. Understanding the Indicator's Context
The indicator generates signals based on confluence (trend, volume, key zones, etc.), but it does not include predefined SL or TP levels. To establish them, we must:
Use dynamic or static support/resistance levels already present in the script.
Incorporate volatility (such as ATR) to adjust the levels based on market conditions.
Define a risk/reward ratio (e.g., 1:2).
2. Options for Determining SL and TP
Below, I provide several ideas based on the tools available in the script:
Stop Loss (SL)
The SL should protect you from adverse movements. You can base it on:
ATR (Volatility): Use the smoothed ATR (atr_smooth) multiplied by a factor (e.g., 1.5 or 2) to set a dynamic SL.
Buy: SL = Entry Price - (atr_smooth * atr_mult).
Sell: SL = Entry Price + (atr_smooth * atr_mult).
Key Zones: Place the SL below a support (for buys) or above a resistance (for sells), using Order Blocks, Fair Value Gaps, or Liquidity Zones.
Buy: SL below the nearest ob_lows or fvg_lows.
Sell: SL above the nearest ob_highs or fvg_highs.
VWAP: Use the daily VWAP (vwap_day) as a critical level.
Buy: SL below vwap_day.
Sell: SL above vwap_day.
Take Profit (TP)
The TP should maximize profits. You can base it on:
Risk/Reward Ratio: Multiply the SL distance by a factor (e.g., 2 or 3).
Buy: TP = Entry Price + (SL Distance * 2).
Sell: TP = Entry Price - (SL Distance * 2).
Key Zones: Target the next resistance (for buys) or support (for sells).
Buy: TP at the next ob_highs, fvg_highs, or liq_zone_high.
Sell: TP at the next ob_lows, fvg_lows, or liq_zone_low.
Ichimoku: Use the cloud levels (Senkou Span A/B) as targets.
Buy: TP at senkou_span_a or senkou_span_b (whichever is higher).
Sell: TP at senkou_span_a or senkou_span_b (whichever is lower).
3. Practical Implementation
Since the script does not automatically draw SL/TP, you can:
Calculate them manually: Observe the chart and use the levels mentioned.
Modify the code: Add SL/TP as labels (label.new) at the moment of the signal.
Here’s an example of how to modify the code to display SL and TP based on ATR with a 1:2 risk/reward ratio:
Modified Code (Signals Section)
Find the lines where the signals (trade_buy and trade_sell) are generated and add the following:
pinescript
// Calculate SL and TP based on ATR
atr_sl_mult = 1.5 // Multiplier for SL
atr_tp_mult = 3.0 // Multiplier for TP (1:2 ratio)
sl_distance = atr_smooth * atr_sl_mult
tp_distance = atr_smooth * atr_tp_mult
if trade_buy
entry_price = close
sl_price = entry_price - sl_distance
tp_price = entry_price + tp_distance
label.new(bar_index, low, "Buy: " + str.tostring(math.round(bull_conditions, 1)), color=color.green, textcolor=color.white, style=label.style_label_up, size=size.tiny)
label.new(bar_index, sl_price, "SL: " + str.tostring(math.round(sl_price, 2)), color=color.red, textcolor=color.white, style=label.style_label_down, size=size.tiny)
label.new(bar_index, tp_price, "TP: " + str.tostring(math.round(tp_price, 2)), color=color.blue, textcolor=color.white, style=label.style_label_up, size=size.tiny)
if trade_sell
entry_price = close
sl_price = entry_price + sl_distance
tp_price = entry_price - tp_distance
label.new(bar_index, high, "Sell: " + str.tostring(math.round(bear_conditions, 1)), color=color.red, textcolor=color.white, style=label.style_label_down, size=size.tiny)
label.new(bar_index, sl_price, "SL: " + str.tostring(math.round(sl_price, 2)), color=color.red, textcolor=color.white, style=label.style_label_up, size=size.tiny)
label.new(bar_index, tp_price, "TP: " + str.tostring(math.round(tp_price, 2)), color=color.blue, textcolor=color.white, style=label.style_label_down, size=size.tiny)
Code Explanation
SL: Calculated by subtracting/adding sl_distance to the entry price (close) depending on whether it’s a buy or sell.
TP: Calculated with a double distance (tp_distance) for a 1:2 risk/reward ratio.
Visualization: Labels are added to the chart to display SL (red) and TP (blue).
4. Practical Strategy Without Modifying the Code
If you don’t want to modify the script, follow these steps manually:
Entry: Take the trade_buy or trade_sell signal.
SL: Check the smoothed ATR (atr_smooth) on the chart or calculate a fixed level (e.g., 1.5 times the ATR). Also, review nearby key zones (OB, FVG, VWAP).
TP: Define a target based on the next key zone or multiply the SL distance by 2 or 3.
Example:
Buy at 100, ATR = 2.
SL = 100 - (2 * 1.5) = 97.
TP = 100 + (2 * 3) = 106.
5. Recommendations
Test in Demo: Apply this logic in a demo account to adjust the multipliers (atr_sl_mult, atr_tp_mult) based on the market (forex or crypto).
Combine with Zones: If the ATR-based SL is too wide, use the nearest OB or FVG as a reference.
Risk/Reward Ratio: Adjust the TP based on your tolerance (1:1, 1:2, 1:3)

Risk & Position DashboardRisk & Position Dashboard
Overview
The Risk & Position Dashboard is a comprehensive trading tool designed to help traders calculate optimal position sizes, manage risk, and visualize potential profit/loss scenarios before entering trades. This indicator provides real-time calculations for position sizing based on account size, risk percentage, and stop-loss levels, while displaying multiple take-profit targets with customizable risk-reward ratios.
Key Features
Position Sizing & Risk Management:
Automatic position size calculation based on account size and risk percentage
Support for leveraged trading with maximum leverage limits
Fractional shares support for brokers that allow partial share trading
Real-time fee calculation including entry, stop-loss, and take-profit fees
Break-even price calculation including trading fees
Multi-Target Profit Management:
Support for up to 3 take-profit levels with individual portion allocations
Customizable risk-reward ratios for each take-profit target
Visual profit/loss zones displayed as colored boxes on the chart
Individual profit calculations for each take-profit level
Visual Dashboard:
Clean, customizable table display showing all key metrics
Configurable label positioning and styling options
Real-time tracking of whether stop-loss or take-profit levels have been reached
Color-coded visual zones for easy identification of risk and reward areas
Advanced Configuration:
Comprehensive input validation and error handling
Support for different chart timeframes and symbols
Customizable colors, fonts, and display options
Hide/show individual data fields for personalized dashboard views
How to Use
Set Account Parameters: Configure your account size, maximum risk percentage per trade, and trading fees in the "Account Settings" section.
Define Trade Setup: Use the "Entry" time picker to select your entry point on the chart, then input your entry price and stop-loss level.
Configure Take Profits: Set your desired risk-reward ratios and portion allocations for each take-profit level. The script supports 1-3 take-profit targets.
Analyze Results: The dashboard will automatically calculate and display position size, number of shares, potential profits/losses, fees, and break-even levels.
Visual Confirmation: Colored boxes on the chart show profit zones (green) and loss zones (red), with lines extending to current price levels.
Reset Entry and SL:
You can easily reset the entry and stop-loss by clicking the "Reset points..." button from the script's "More" menu.
This is useful if you want to quickly clear your current trade setup and start fresh without manually adjusting the points on the chart.
Calculations
The script performs sophisticated calculations including:
Position size based on risk amount and price difference between entry and stop-loss
Leverage requirements and position amount calculations
Fee-adjusted risk-reward ratios for realistic profit expectations
Break-even price including all trading costs
Individual profit calculations for partial position closures
Detailed Take-Profit Calculation Formula:
The take-profit prices are calculated using the following mathematical formula:
// Core variables:
// risk_amount = account_size * (risk_percentage / 100)
// total_risk_per_share = |entry_price - sl_price| + (entry_price * fee%) + (sl_price * fee%)
// shares = risk_amount / total_risk_per_share
// direction_factor = 1 for long positions, -1 for short positions
// Take-profit calculation:
net_win = total_risk_per_share * shares * RR_ratio
tp_price = (net_win + (direction_factor * entry_price * shares) + (entry_price * fee% * shares)) / (direction_factor * shares - fee% * shares)
Step-by-step example for a long position (based on screenshot):
Account Size: 2,000 USDT, Risk: 2% = 40 USDT
Entry: 102,062.9 USDT, Stop Loss: 102,178.4 USDT, Fee: 0.06%
Risk per share: |102,062.9 - 102,178.4| + (102,062.9 × 0.0006) + (102,178.4 × 0.0006) = 115.5 + 61.24 + 61.31 = 238.05 USDT
Shares: 40 ÷ 238.05 = 0.168 shares (rounded to 0.17 in display)
Position Size: 0.17 × 102,062.9 = 17,350.69 USDT
Position Amount (with 9x leverage): 17,350.69 ÷ 9 = 1,927.85 USDT
For 2:1 RR: Net win = 238.05 × 0.17 × 2 = 80.94 USDT
TP1 price = (80.94 + (1 × 102,062.9 × 0.17) + (102,062.9 × 0.0006 × 0.17)) ÷ (1 × 0.17 - 0.0006 × 0.17) = 101,464.7 USDT
For 3:1 RR: TP2 price = 101,226.7 USDT (following same formula with RR=3)
This ensures that after accounting for all fees, the actual risk-reward ratio matches the specified target ratio.
Risk Management Features
Maximum Trade Amount: Optional setting to limit position size regardless of account size
Leverage Limits: Built-in maximum leverage protection
Fee Integration: All calculations include realistic trading fees for accurate expectations
Validation: Automatic checking that take-profit portions sum to 100%
Historical Tracking: Visual indication when stop-loss or take-profit levels are reached (within last 5000 bars)
Understanding Max Trade Amount - Multiple Simultaneous Trades:
The "Max Trade Amount" feature is designed for traders who want to open multiple positions simultaneously while maintaining proper risk management. Here's how it works:
Key Concept:
- Risk percentage (2%) always applies to your full Account Size
- Max Trade Amount limits the capital allocated per individual trade
- This allows multiple trades with full risk on each trade
Example from Screenshot:
Account Size: 2,000 USDT
Max Trade Amount: 500 USDT
Risk per Trade: 2% × 2,000 = 40 USDT per trade
Stop Loss Distance: 0.11% from entry
Result: Position Size = 17,350.69 USDT with 35x leverage
Total Risk (including fees): 40.46 USDT
Multiple Trades Strategy:
With this setup, you can open:
Trade 1: 40 USDT risk, 495.73 USDT position amount (35x leverage)
Trade 2: 40 USDT risk, 495.73 USDT position amount (35x leverage)
Trade 3: 40 USDT risk, 495.73 USDT position amount (35x leverage)
Trade 4: 40 USDT risk, 495.73 USDT position amount (35x leverage)
Total Portfolio Exposure:
- 4 simultaneous trades = 4 × 495.73 = 1,982.92 USDT position amount
- Total risk exposure = 4 × 40 = 160 USDT (8% of account)

PivotBoss VWAP Bands (Auto TF) - FixedWhat this indicator shows (high level)
The indicator plots a VWAP line and three bands above (R1, R2, R3) and three bands below (S1, S2, S3).
Band spacing is computed from STD(abs(VWAP − price), N) and multiplied by 1, 2 and 3 to form R1–R3 / S1–S3. The script is timeframe-aware: on 30m/1H charts it uses Weekly VWAP and weekly bands; on Daily charts it uses Monthly VWAP and monthly bands; otherwise it uses the session/chart VWAP.
VWAP = the market’s volume-weighted average price (a measure of fair value). Bands = volatility-scaled zones around that fair value.
Trading idea — concept summary
VWAP = fair value. Price above VWAP implies bullish bias; below VWAP implies bearish bias.
Bands = graded overbought/oversold zones. R1/S1 are near-term limits, R2/S2 are stronger, R3/S3 are extreme.
Use trend alignment + price action + volume to choose higher-probability trades. VWAP bands give location and magnitude; confirmations reduce false signals.
Entry rules (multiple strategies with examples)
A. Momentum breakout (trend-following) — preferred on trending markets
Setup: Price consolidates near or below R1 and then closes above R1 with above-average volume. Chart: 30m/1H (Weekly VWAP) or Daily (Monthly VWAP) depending on your timeframe.
Entry: Enter long at the close of the breakout bar that closes above R1.
Stop-loss: Place initial stop below the higher of (VWAP or recent swing low). Example: if price broke R1 at ₹1,200 and VWAP = ₹1,150, set stop at ₹1,145 (5 rupee buffer below VWAP) or below the last swing low if that is wider.
Target: Partial target at R2, full target at R3. Trail stop to VWAP or to R1 after price reaches R2.
Example numeric: Weekly VWAP = ₹1,150, R1 = ₹1,200, R2 = ₹1,260. Buy at ₹1,205 (close above R1), stop ₹1,145, target1 ₹1,260 (R2), target2 ₹1,320 (R3).
B. Mean-reversion fade near bands — for range-bound markets
Setup: Market is not trending (VWAP flatish). Price rallies up to R2 or R3 and shows rejection (pin bar, bearish engulfing) on increasing or neutral volume.
Entry: Enter short after a confirmed rejection candle that fails to sustain above R2 or R3 (prefer confirmation: close back below R1 or below the rejection candle low).
Stop-loss: Just above the recent high (e.g., 1–2 ATR or a fixed buffer above R2/R3).
Target: First target VWAP, second target S1. Reduce size if taking R3 fade as it’s an extreme.
Example numeric: VWAP = ₹950, R2 = ₹1,020. Price spikes to ₹1,025 and forms a bearish engulfing candle. Enter short at ₹1,015 after the next close below ₹1,020. Stop at ₹1,035, target VWAP ₹950.
C. Pullback entries in trending markets — higher probability
Setup: Price is above VWAP and trending higher (higher highs and higher lows). Price pulls back toward VWAP or S1 with decreasing downside volume and a reversal candle forms.
Entry: Long when price forms a bullish reversal (hammer/inside-bar) with a close back above the pullback candle.
Stop-loss: Below the pullback low (or below S2 if a larger stop is justified).
Target: VWAP then R1; if momentum resumes, trail toward R2/R3.
Example numeric: Price trending above Weekly VWAP at ₹1,400; pullback to S1 at ₹1,360. Enter long at ₹1,370 when a bullish candle closes; stop at ₹1,350; first target VWAP ₹1,400, second target R1 ₹1,450.
Exit rules and money management
Basic exit hierarchy
Hard stop exit — when price hits initial stop-loss. Always use.
Target exit — take partial profits at R1/R2 (for longs) or S1/S2 (for shorts). Use trailing stops for the remainder.
VWAP invalidation — if you entered long above VWAP and price returns and closes significantly below VWAP, consider exiting (condition depends on timeframe and trade size).
Price action exit — reversal patterns (strong opposite candle, bearish/bullish engulfing) near targets or beyond signals to exit.
Trailing rules
After price reaches R2, move stop to breakeven + a small buffer or to VWAP.
After price reaches R3, trail by 1 ATR or lock a defined profit percentage.
Position sizing & risk
Risk per trade: commonly 0.5–2% of account equity.
Determine position size by RiskAmount ÷ (EntryPrice − StopPrice).
If the stop distance is large (e.g., trading R3 fades), reduce position size.
Filters & confirmation (to reduce false signals)
Volume filter: For breakouts, require volume above short-term average (e.g., >20-period average). Breakouts on low volume are suspect.
Trend filter: Only take breakouts in the direction of the higher-timeframe trend (for example, use Daily/Weekly trend when trading 30m/1H).
Candle confirmation: Prefer entries on close of the confirming candle (not intrabar noise).
Multiple confirmations: When R1 break happens but RSI/plotted momentum indicator does not confirm, treat signal as lower probability.
Special considerations for timeframe-aware logic
On 30m/1H the script uses Weekly VWAP/bands. That means band levels change only on weekly candles — they are strong, structural levels. Treat R1/R2/R3 as significant and expect fewer, stronger signals.
On Daily, the script uses Monthly VWAP/bands. These are wider; trades should allow larger stops and smaller position sizes (or be used for swing trades).
On other intraday charts you get session VWAP (useful for intraday scalps).
Example: If you trade 1H and the Weekly R1 is at ₹2,400 while session VWAP is ₹2,350, a close above Weekly R1 represents a weekly-level breakout — prefer that for swing entries rather than scalps.
Example trade walkthrough (step-by-step)
Context: 1H chart, auto-mapped → Weekly VWAP used.
Weekly VWAP = ₹3,000; R1 = ₹3,080; R2 = ₹3,150.
Price consolidates below R1. A large bullish candle closes at ₹3,085 with volume 40% above the 20-bar average.
Entry: Buy at close ₹3,085.
Stop: Place stop at ₹2,995 (just under Weekly VWAP). Risk = ₹90.
Position size: If risking ₹900 per trade → size = 900 ÷ 90 = 10 units.
Targets: Partial take-profit at R2 = ₹3,150; rest trailed with stop moved to breakeven after R2 is hit.
If price reverses and closes below VWAP within two bars, exit immediately to limit drawdown.
When to avoid trading these signals
High-impact news (earnings, macro announcements) that can gap through bands unpredictably.
Thin markets with low volume — VWAP loses significance when volumes are extremely low.
When weekly/monthly bands are flat but intraday price is volatile without clear structure — prefer session VWAP on smaller timeframes.
Alerts & automation suggestions
Alert on close above R1 / below S1 (use the built-in alertcondition the script adds). For higher-confidence alerts, require volume filter in the alert condition.
Automated order rules (if you automate): use limit entry at breakout close plus a small slippage buffer, immediate stop order, and OCO for TP and SL.

Katz Exploding PowerBand FilterUnderstanding the Katz Exploding PowerBand Filter (EPBF) v2.4
1. Indicator Overview
The Katz Exploding PowerBand Filter (EPBF) is an advanced technical indicator designed to identify moments of expanding bullish or bearish momentum, often referred to as "power." It operates as a standalone oscillator in a separate pane below the main price chart.
Its primary goal is to measure underlying market strength by calculating custom "Bull" and "Bear" power components. These components are then filtered through a versatile moving average and a dual signal line system to generate clear entry and exit signals. This indicator is not a simple momentum oscillator; it uses a unique calculation based on exponential envelopes of both price and squared price to derive its values.
2. On-Chart Lines and Components
The indicator pane consists of five main lines:
Bullish Component (Thick Green/Blue/Yellow/Gray Line): This is the core of the indicator. It represents the calculated bullish "power" or momentum in the market.
Bright Green: Indicates a strong, active long signal condition.
Blue: Shows the bull component is above the MA filter, but the filter itself is still pointing down—a potential sign of a reversal or weakening downtrend.
Yellow: A warning sign that bullish power is weakening and has fallen below the primary signal lines.
Gray: Represents neutral or insignificant bullish power.
Bearish Component (Thick Red/Purple/Yellow/Gray Line): This line represents the calculated bearish "power" or downward momentum.
Bright Red: Indicates a strong, active short signal condition.
Purple: Shows the bear component is above the MA filter, but the filter itself is still pointing down—a sign of potential trend continuation.
Yellow: A warning sign that bearish power is weakening.
Gray: Represents neutral or insignificant bearish power.
MA Filter (Purple Line): This is the main filter, calculated using the moving average type and length you select in the settings (e.g., HullMA, EMA). The Bull and Bear components are compared against this line to determine the underlying trend bias.
Signal Line 1 (Orange Line): A fast Exponential Moving Average (EMA) of the stronger power component. It acts as the first level of dynamic support or resistance for the power lines.
Signal Line 2 (Lime/Gray Line): A slower EMA that acts as a confirmation filter.
Lime Green: The line turns lime when it is rising and the faster Signal Line 1 is above it, indicating a confirmed bullish trend in momentum.
Gray: Indicates a neutral or bearish momentum trend.
3. On-Chart Symbols and Their Meanings
Various characters are plotted at the bottom of the indicator pane to provide clear, actionable signals.
L (Pre-Long Signal): The first sign of a potential long entry. It appears when the Bullish Component rises and crosses above both signal lines for the first time.
S (Pre-Short Signal): The first sign of a potential short entry. It appears when the Bearish Component rises and crosses above both signal lines for the first time.
▲ (Post-Long Signal): A stronger confirmation for a long entry. It appears with the 'L' signal only if the momentum trend is also confirmed bullish (i.e., the slower Signal Line 2 is lime green).
▼ (Post-Short Signal): A stronger confirmation for a short entry. It appears with the 'S' signal only if the momentum trend is confirmed bullish.
Exit / Take-Profit Symbols:
These symbols appear when a power component crosses below a line, suggesting that momentum is fading and it may be time to take profit.
⚠️ (Exit Signal 1): The Bull/Bear component has crossed below the main MA Filter. This is the first and most sensitive take-profit signal.
☣️ (Exit Signal 2): The Bull/Bear component has crossed below the faster Signal Line 1. This is a moderate take-profit signal.
🚼 (Exit Signal 3): The Bull/Bear component has crossed below the slower Signal Line 2. This is the slowest take-profit signal, suggesting the trend is more definitively exhausted.
4. Trading Strategy and Rules
Long Entry Rules:
Initial Signal: Wait for an L to appear at the bottom of the indicator. This confirms that bullish power is expanding.
Confirmation (Recommended): For a higher-probability trade, wait for a green ▲ symbol to appear. This confirms the underlying momentum trend aligns with the signal.
Entry: Enter a long (buy) position on the opening of the next candle after the signal appears.
Short Entry Rules:
Initial Signal: Wait for an S to appear at the bottom of the indicator. This confirms that bearish power is expanding.
Confirmation (Recommended): For a higher-probability trade, wait for a maroon ▼ symbol to appear. This confirms the underlying momentum trend aligns with the signal.
Entry: Enter a short (sell) position on the opening of the next candle after the signal appears.
Take Profit (TP) Rules:
The indicator provides three levels of take-profit signals. You can choose to exit your entire position or scale out at each level.
For a long trade, exit when you see ⚠️, ☣️, or 🚼 appear below the Bullish Component.
For a short trade, exit when you see ⚠️, ☣️, or 🚼 appear below the Bearish Component.
Stop Loss (SL) Rules:
The indicator does not provide an explicit stop loss. You must use your own risk management rules. Common methods include:
Swing High/Low: For a long position, place your stop loss below the most recent significant swing low on the price chart. For a short position, place it above the most recent swing high.
ATR-Based: Use an Average True Range (ATR) indicator to set a volatility-based stop loss.
Fixed Percentage: Risk a fixed percentage (e.g., 1-2%) of your account on the trade.
5. Disclaimer
This indicator is a tool for technical analysis and should not be considered financial advice. All trading involves significant risk, and past performance is not indicative of future results. The signals generated by this indicator are probabilistic and can result in losing trades. Always use proper risk management, such as setting a stop loss, and never risk more than you are willing to lose. It is recommended to backtest this indicator and use it in conjunction with other forms of analysis before trading with real capital. The indicator should only be used for educational purposes.

EAOBS by MIGVersion 1
1. Strategy Overview Objective: Capitalize on breakout movements in Ethereum (ETH) price after the Asian open pre-market session (7:00 PM–7:59 PM EST) by identifying high and low prices during the session and trading breakouts above the high or below the low.
Timeframe: Any (script is timeframe-agnostic, but align with session timing).
Session: Pre-market session (7:00 PM–7:59 PM EST, adjustable for other time zones, e.g., 12:00 AM–12:59 AM GMT).
Risk-Reward Ratios (R:R): Targets range from 1.2:1 to 5.2:1, with a fixed stop loss.
Instrument: Ethereum (ETH/USD or ETH-based pairs).
2. Market Setup Session Monitoring: Monitor ETH price action during the pre-market session (7:00 PM–7:59 PM EST), which aligns with the Asian market open (e.g., 9:00 AM–9:59 AM JST).
The script tracks the highest high and lowest low during this session.
Breakout Triggers: Buy Signal: Price breaks above the session’s high after the session ends (7:59 PM EST).
Sell Signal: Price breaks below the session’s low after the session ends.
Visualization: The session is highlighted on the chart with a white background.
Horizontal lines are drawn at the session’s high and low, extended for 30 bars, along with take-profit (TP) and stop-loss (SL) levels.
3. Entry Rules Long (Buy) Entry: Enter a long position when the price breaks above the session’s high price after 7:59 PM EST.
Entry price: Just above the session high (e.g., add a small buffer, like 0.1–0.5%, to avoid false breakouts, depending on volatility).
Short (Sell) Entry: Enter a short position when the price breaks below the session’s low price after 7:59 PM EST.
Entry price: Just below the session low (e.g., subtract a small buffer, like 0.1–0.5%).
Confirmation: Use a candlestick close above/below the breakout level to confirm the entry.
Optionally, add volume confirmation or a momentum indicator (e.g., RSI or MACD) to filter out weak breakouts.
Position Size: Calculate position size based on risk tolerance (e.g., 1–2% of account per trade).
Risk is determined by the stop-loss distance (10 points, as defined in the script).
4. Exit Rules Take-Profit Levels (in points, based on script inputs):TP1: 12 points (1.2:1 R:R).
TP2: 22 points (2.2:1 R:R).
TP3: 32 points (3.2:1 R:R).
TP4: 42 points (4.2:1 R:R).
TP5: 52 points (5.2:1 R:R).
Example for Long: If session high is 3000, TP levels are 3012, 3022, 3032, 3042, 3052.
Example for Short: If session low is 2950, TP levels are 2938, 2928, 2918, 2908, 2898.
Strategy: Scale out of the position (e.g., close 20% at TP1, 20% at TP2, etc.) or take full profit at a preferred TP level based on market conditions.
Stop-Loss: Fixed at 10 points from the entry.
Long SL: Session high - 10 points (e.g., entry at 3000, SL at 2990).
Short SL: Session low + 10 points (e.g., entry at 2950, SL at 2960).
Trailing Stop (Optional):After reaching TP2 or TP3, consider trailing the stop to lock in profits (e.g., trail by 10–15 points below the current price).
5. Risk Management per Trade: Limit risk to 1–2% of your trading account per trade.
Calculate position size: Account Size × Risk % ÷ (Stop-Loss Distance × ETH Price per Point).
Example: $10,000 account, 1% risk = $100. If SL = 10 points and 1 point = $1, position size = $100 ÷ 10 = 0.1 ETH.
Daily Risk Limit: Cap daily losses at 3–5% of the account to avoid overtrading.
Maximum Exposure: Avoid taking both long and short positions simultaneously unless using separate accounts or strategies.
Volatility Consideration: Adjust position size during high-volatility periods (e.g., major news events like Ethereum upgrades or macroeconomic announcements).
6. Trade Management Monitoring :Watch for breakouts after 7:59 PM EST.
Monitor price action near TP and SL levels using alerts or manual checks.
Trade Duration: Breakout lines extend for 30 bars (script parameter). Close trades if no TP or SL is hit within this period, or reassess based on market conditions.
Adjustments: If the market shows strong momentum, consider holding beyond TP5 with a trailing stop.
If the breakout fails (e.g., price reverses before TP1), exit early to minimize losses.
7. Additional Considerations Market Conditions: The 7:00 PM–7:59 PM EST session aligns with the Asian market open (e.g., Tokyo Stock Exchange open at 9:00 AM JST), which may introduce higher volatility due to Asian trading activity.
Avoid trading during low-liquidity periods or extreme volatility (e.g., major crypto news).
Check for upcoming events (e.g., Ethereum network upgrades, ETF decisions) that could impact price.
Backtesting: Test the strategy on historical ETH data using the session high/low breakouts for the 7:00 PM–7:59 PM EST window to validate performance.
Adjust TP/SL levels based on backtest results if needed.
Broker and Fees: Use a low-fee crypto exchange (e.g., Binance, Kraken, Coinbase Pro) to maximize R:R.
Account for trading fees and slippage in your position sizing.
Time zone Adjustment: Adjust session time input for your time zone (e.g., "0000-0059" for GMT).
Ensure your trading platform’s clock aligns with the script’s time zone (default: America/New_York).
8. Example Trade Scenario: Session (7:00 PM–7:59 PM EST) records a high of 3050 and a low of 3000.
Long Trade: Entry: Price breaks above 3050 (e.g., enter at 3051).
TP Levels: 3063 (TP1), 3073 (TP2), 3083 (TP3), 3093 (TP4), 3103 (TP5).
SL: 3040 (3050 - 10).
Position Size: For a $10,000 account, 1% risk = $100. SL = 11 points ($11). Size = $100 ÷ 11 = ~0.09 ETH.
Short Trade: Entry: Price breaks below 3000 (e.g., enter at 2999).
TP Levels: 2987 (TP1), 2977 (TP2), 2967 (TP3), 2957 (TP4), 2947 (TP5).
SL: 3010 (3000 + 10).
Position Size: Same as above, ~0.09 ETH.
Execution: Set alerts for breakouts, enter with limit orders, and monitor TPs/SL.
9. Tools and Setup Platform: Use TradingView to implement the Pine Script and visualize breakout levels.
Alerts: Set price alerts for breakouts above the session high or below the session low after 7:59 PM EST.
Set alerts for TP and SL levels.
Chart Settings: Use a 1-minute or 5-minute chart for precise session tracking.
Overlay the script to see high/low lines, TP levels, and SL levels.
Optional Indicators: Add RSI (e.g., avoid overbought/oversold breakouts) or volume to confirm breakouts.
10. Risk Warnings Crypto Volatility: ETH is highly volatile; unexpected news can cause rapid price swings.
False Breakouts: Breakouts may fail, especially in low-volume sessions. Use confirmation signals.
Leverage: Avoid high leverage (e.g., >5x) to prevent liquidation during volatile moves.
Session Accuracy: Ensure correct session timing for your time zone to avoid misaligned entries.
11. Performance Tracking Journaling :Record each trade’s entry, exit, R:R, and outcome.
Note market conditions (e.g., trending, ranging, news-driven).
Review: Weekly: Assess win rate, average R:R, and adherence to the plan.
Monthly: Adjust TP/SL or session timing based on performance.

ai quant oculusAI QUANT OCULUS
Version 1.0 | Pine Script v6
Purpose & Innovation
AI QUANT OCULUS integrates four distinct technical concepts—exponential trend filtering, adaptive smoothing, momentum oscillation, and Gaussian smoothing—into a single, cohesive system that delivers clear, objective buy and sell signals along with automatically plotted stop-loss and three profit-target levels. This mash-up goes beyond a simple EMA crossover or standalone TRIX oscillator by requiring confluence across trend, adaptive moving averages, momentum direction, and smoothed price action, reducing false triggers and focusing on high‐probability turning points.
How It Works & Why Its Components Matter
Trend Filter: EMA vs. Adaptive MA
EMA (20) measures the prevailing trend with fixed sensitivity.
Adaptive MA (also EMA-based, length 10) approximates a faster-responding moving average, standing in for a KAMA-style filter.
Bullish bias requires AMA > EMA; bearish bias requires AMA < EMA. This ensures signals align with both the underlying trend and a more nimble view of recent price action.
Momentum Confirmation: TRIX
Calculates a triple-smoothed EMA of price over TRIX Length (15), then converts it to a percentage rate-of-change oscillator.
Positive TRIX reinforces bullish entries; negative TRIX reinforces bearish entries. Using TRIX helps filter whipsaws by focusing on sustained momentum shifts.
Gaussian Price Smoother
Applies two back-to-back 5-period EMAs to the price (“gaussian” smoothing) to remove short-term noise.
Price above the smoothed line confirms strength for longs; below confirms weakness for shorts. This layer avoids entries on erratic spikes.
Confluence Signals
Buy Signal (isBull) fires only when:
AMA > EMA (trend alignment)
TRIX > 0 (momentum support)
Close > Gaussian (price strength)
Sell Signal (isBear) fires under the inverse conditions.
Requiring all three conditions simultaneously sharply reduces false triggers common to single-indicator systems.
Automatic Risk & Reward Plotting
On each new buy or sell signal (edge detection via not isBull or not isBear ), the script:
Stores entryPrice at the signal bar’s close.
Draws a stop-loss line at entry minus ATR(14) × Stop Multiplier (1.5) by default.
Plots three profit-target lines at entry plus ATR × Target Multiplier (1×, 1.5×, and 2×).
All previous labels and lines are deleted on each new signal, keeping the chart uncluttered and focusing only on the current trade.
Inputs & Customization
Input Description Default
EMA Length Period for the main trend EMA 20
Adaptive MA Length Period for the faster adaptive EM A substitute 10
TRIX Length Period for the triple-smoothed momentum oscillator 15
Dominant Cycle Length (Reserved) 40
Stop Multiplier ATR multiple for stop-loss distance 1.5
Target Multiplier ATR multiple for first profit target 1.5
Show Buy/Sell Signals Toggle on-chart labels for entry signals On
How to Use
Apply to Chart: Best on 15 m–1 h timeframes for swing entries or 5 m for agile scalps.
Wait for Full Confluence:
Look for the AMA to cross above/below the EMA and verify TRIX and Gaussian conditions on the same bar.
A bright “LONG” or “SHORT” label marks your entry.
Manage the Trade:
Place your stop where the red or green SL line appears.
Scale or exit at the three yellow TP1/TP2/TP3 lines, automatically drawn by volatility.
Repeat Cleanly: Each new signal clears prior annotations, ensuring you only track the active setup.
Why This Script Stands Out
Multi-Layer Confluence: Trend, momentum, and noise-reduction must all align, addressing the weaknesses of single-indicator strategies.
Automated Trade Management: No manual plotting—stop and target lines appear seamlessly with each signal.
Transparent & Customizable: All logic is open, adjustable, and clearly documented, allowing traders to tweak lengths and multipliers to suit different instruments.
Disclaimer
No indicator guarantees profit. Always backtest AI QUANT OCULUS extensively, combine its signals with your own analysis and risk controls, and practice sound money management before trading live.
